Hi everyone! Man, the project gods were NOT on my side this weekend y’all. While I did get three smaller ones knocked out, the bigger DIY that was my mail goal this weekend was all sorts of messed up. I’ll save you the hella long story and just say that I am NOT friends with crown molding….at all. It always seems to me that the easier I think a project will be, the more difficult it goes. Does anyone else feel that way?? Hopefully it’s not just my luck!
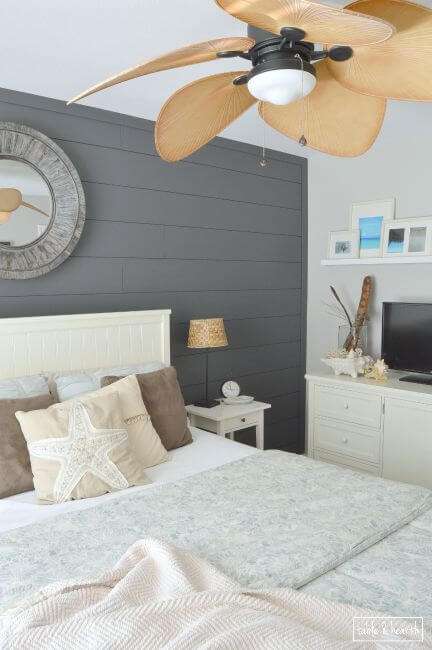
So, to make up for my craptastic weekend project-wise, I’m sharing one of my projects that was the opposite. One I feared would be difficult but ended up being one of the easiest and most successful projects I’ve done yet…our DIY shiplap wall in the guest bedroom!
If you’ve been around here for any amount of time, you’ve probably sensed my obsession with planked walls. It was only exacerbated by Joanna Gaines…now it’s outta control. They’re classic, they’re casual, they’re farmhouse, and they’re the perfect way to add a little interest to a boring wall.
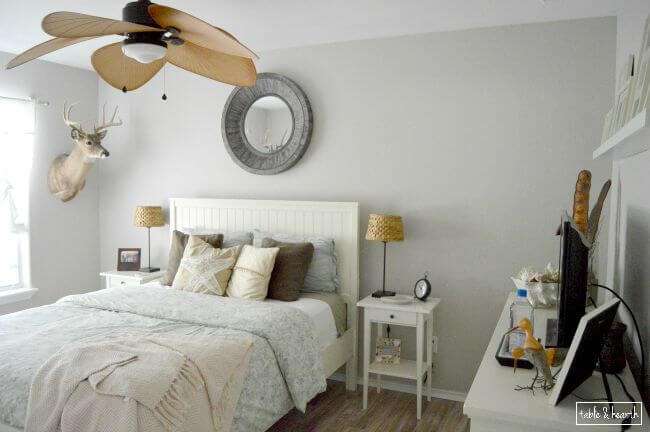
The guest room has come a loooong way since we moved in six years ago (see it way back in the day here) but it still was lacking some ooomph (although, it DID have deer mounts which are sooo in right now, #nope). The room finally reflects our coastal, weathered, and neutral style inspired by the beach a couple miles down the road, but it still needed some contrast and depth, some kind of focal point, you know, other than deer heads. A plank wall was just the ticket!
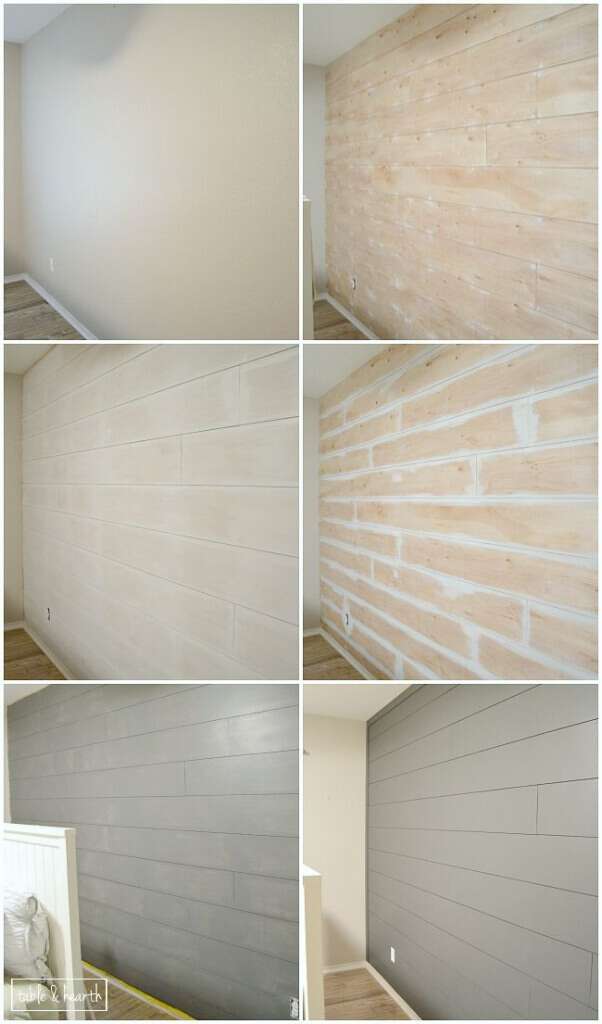
I researched all kinds of materials that you can use to achieve a plank wall; real wood planks themselves, reclaimed wood, or ripped-down panels of hardboards or plywood. I wanted the classic wood look, in wide planks, but couldn’t afford ones that were already cut. Plus, I REALLY didn’t want to have to remove and reinstall our baseboards so I needed something that was 1/4″ thick or less.


So for us, this 1/4″ plywood underlayment was the ticket, especially since the panels are only $13 a piece! I had Home Depot rip them down into 8″ wide planks for just a teeny cutting fee (like, $3). I like my plank walls with nice wiiiiiide planks, but you can make them whatever width you want of course.
DIY Shiplap Supplies
- 4’x8’x1/4″ plywood underlayment, ripped down to 8″ planks* (our wall is ~162″x95″ and it took 4.5 sheets)
- 3″x1/4″x4′ poplar “hobby boards”, aka battens
- Sander with medium grit paper
- Stud finder
- Nail gun with 2″ brad nails (you could hammer them but geez, it’ll take a while)
- Paintable spackle/wood filler
- Miter saw, table saw, circular saw, or jigsaw (we used a jigsaw because that’s all we had then)
- Speed square and pencil
- Primer
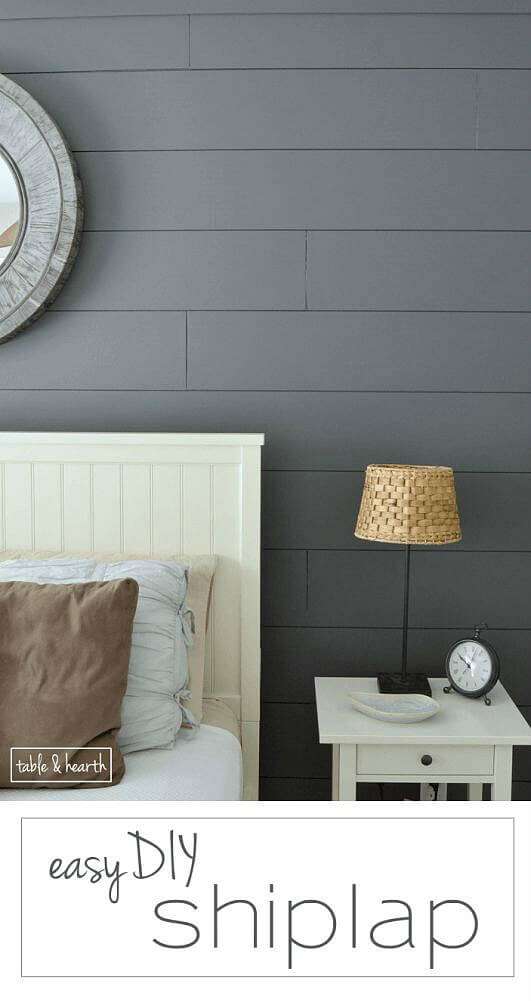
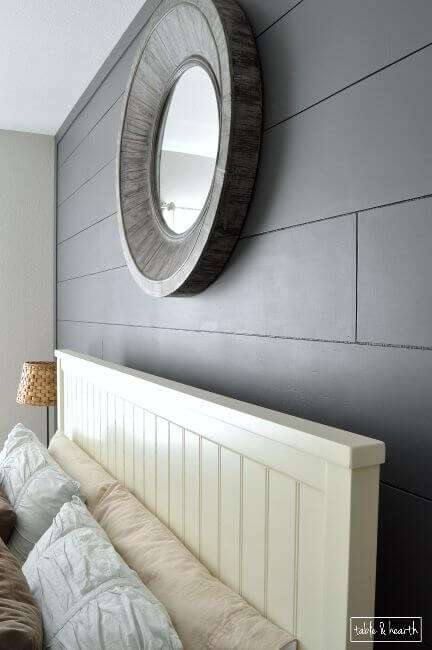
- Paint (I used Sherwin-Williams Duration in “Peppercorn”)
- Coins as spacers
- Painting supplies (tarp, brushes, etc.)
How To Install DIY Shiplap
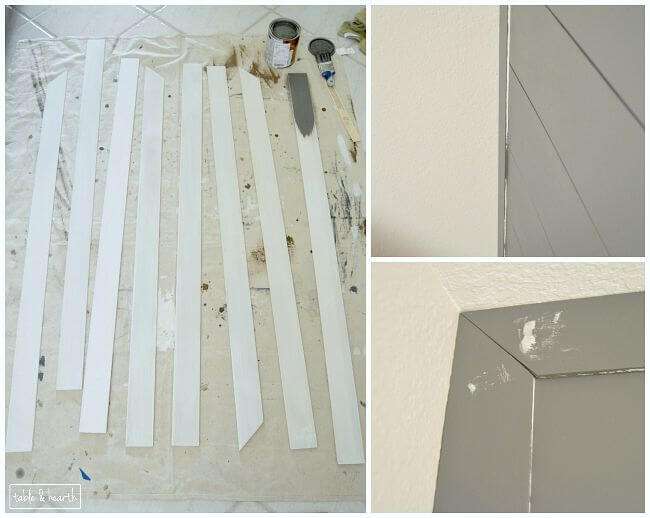
This underlayment is super smooth so all the planks needed was a quick sanding on the edges from being cut and we were ready to roll. I marked our studs, fired up our nail gun, taped few pennies for spacers (two thick), leveled up the first board at the ceiling, then had the hubby start nailin’ them up (don’t be a cool guy like him, wear safety glasses on your face, not your neck!). We staggered our planks randomly, trying to use as many whole-length boards as we could. We marked where we needed to cut the smaller pieces, cut them outside, sanded the edge, then nailed it up. We trimmed around outlets with the jigsaw too.

*Panel PSA: having the panels ripped down into 8″ sections will make the last panel slightly less than 8″ wide due to the width of the saw during the cuts. These are fine for the bottom row, but make sure you don’t accidentally use one anywhere else on the wall like we almost did. If you have a table saw, you can easily rip those shorter planks down to whatever width you need them to be for the bottom row, but we don’t have one, and that would be a daunting task with the handheld jigsaw which is all we had at the time, so I bought another whole panel and had the store rip a few more down, plus the last bottom one which had to be 5.75″.
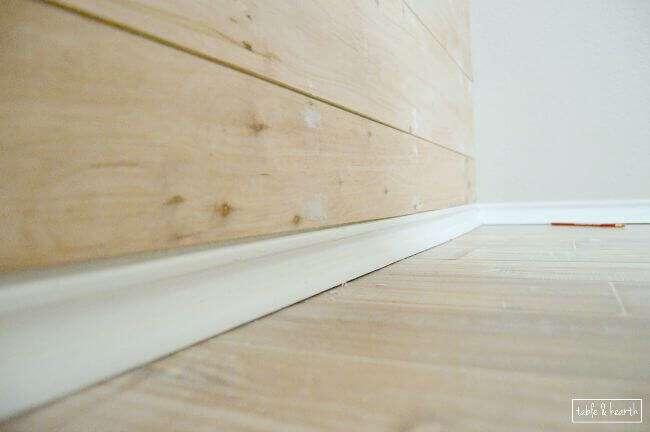
I knew our baseboards would be wonky, based on the wainscoting in our master bedroom, but this room was baaaad. The bottom planks are completely flush at the ends of the wall but in the middle it’s about 1/2″ short. I didn’t fill it or anything, it’s really not that noticeable when standing and luckily that is where the bed goes :) Just annoying.
It only took us a few hours to get the boards up, then I started spackling, sanding, and priming. I only filled in the nail holes, not the knots or the seams between because I wanted to still have the rough, wood-ish features showing through. I did one coat of primer and two coats of paint, using my favorite 1″ brush for the cracks and 4″ brush for the face. I used brushes instead of a roller because I wanted a classic, traditional finish, and with all the gaps I was using a brush for most of it anyway.
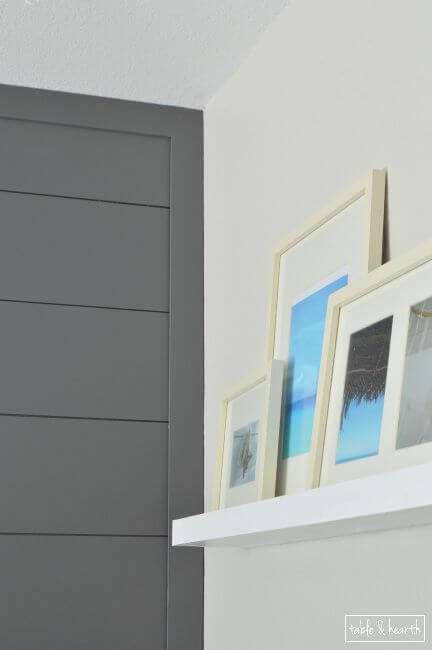
I didn’t paint the edges of the planks cause I knew I’d be trimming it out with some the poplar battens I had left over from my wainscoting so I didn’t bother. I pre-painted those before installing, so I wouldn’t have any cutting in to do except to paint over their spackled nail holes and joints and exposed inner edge. I mitered the top corners then added them to the top and sides of the wall (not the bottom because they’d stick out over the baseboards) and it instantly made the wall polished and complete!
I was a bit concerned that our stupid textured walls would show through the cracks or not, but you really can’t tell unless you get up close and look, and that’s just mean. (other walls are Sherwin-Williams “Alpaca”)

I am in LOVE with how much more drama and interest this simple DIY has brought to our room and how it makes it feel even more beach cottage-y. I love the seams, I love the color, I love the still-wood-feel finish, and I love how easy it was to do :) Even the husband liked participating in this project!

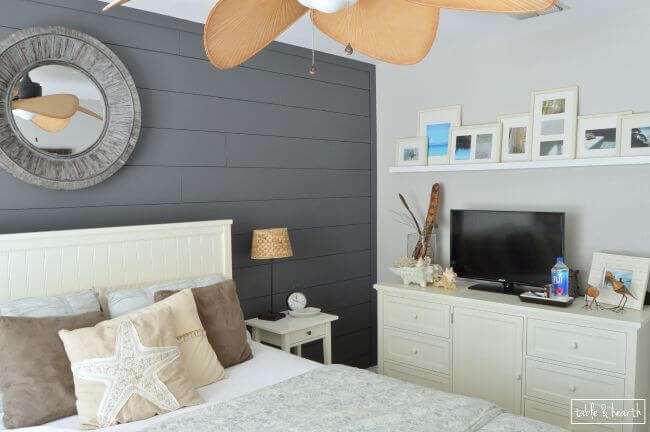
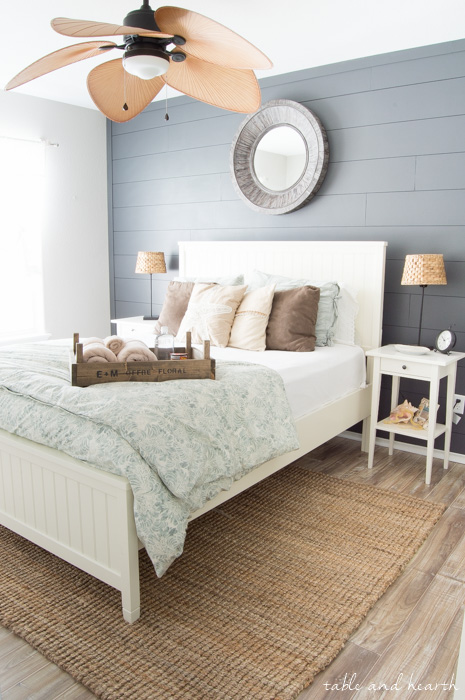
We absolutely love this room and it finally feels complete and like “us”. Hopefully in the next few months I can get the hubby back into a planking groove and do one in the living room!
UPDATE: This room now has quite the adorable new purpose, see the shiplap wall in the new nursery HERE!!!
So, are you guys as obsessed with plank walls and shiplap as I am? I would plank every.single.wall in my home if I could…


miter saw

hobby board

paint

4″ brush

speed square

3″ brush

1″ brush

primer

wood filler

1/4″ underlayment

stud finder

SW “Peppercorn”

nail gun


tie-up shades

clock

ruched sham

quilt

wooden candleholders

coral throw pillow

duvet cover

sheet set

throw blanket

beadboard bedroom set

ceiling fan

lamp base

textured lamp shade

driftwood mirror

laminate flooring

jute rug

wall paint


Coastal Nursery – The REVEAL!

“Fixer Upper” Inspired Crate

Rustic Gray Farmhouse Kitchen Update

Wall Organizer from Old Shutters


Oh my goodness! Totally obsessed with shiplap! LOVE how this turned out Emily and that grey colour is absolutely perfect!!!
Thanks Kristi!! I’m obsessed with that color :)
I’m sorry I have re read your post 3 times but cannot find what the gray color is on the shiplap wall. I’m trying to find a dark gray for our foyer.
Please let me know that color.
Thanks
Jacki A
Oh, so sorry Jacki! It’s up in the supplies list :) It’s Sherwin-Williams “Peppercorn” (SW7674) and it may be my favorite color of all time!
What type of finish did you choose? Satin.
I got the Matte finish :)
What is the other color in the room? I love this look.
The other walls are Sherwin-Williams “Alpaca” :)
Thanks for sharing that ?
Will stain work on this hobby board?
Is hobby board more expensive than a 1×4 or 1×6
Yes, the hobby board is just 1/4″ thin strips of either oak or poplar so it is stainable. I’m not sure about the cost difference, it may depend on which species of wood you are looking at. The reason I used the hobby boards though is because it is only 1/4″ thick, a 1×4 or 1×6 would have been too thick for what I wanted.
Do you think I would be able To do it white and see some wood grain, or would like look solid white?
Amanda, if you water the paint down some you should be able to see the wood grain still. I would take some spare planks and play around with it to find the ratio that you like :)
Sherwin Williams . Peppercorn Gray
Hello Emily, I guess I am a little confused with the pennies used for spacing. Did you space between each horizontal board with the pennies to create the gap look? I am assuming you also did that on the ends. If that is the case was it difficult to get paint into the spaces and back to the base wall?
Hi Dan! We only used the pennies between the boards horizontally, not on the ends. Where they joined at their vertical ends we just eyeballed the gap to roughly match the gap the pennies made horizontally. We were not that concerned with being exact on the vertical seams because I wanted it to have an older handcrafted feel. As far as painting, I was able to get paint onto the base wall just fine using the smaller 1″ brush, it actually was alot easier to do than I was anticipating. Hope this helps :) Let me know if you have any other questions!
Thank you, looks like another project on the horizon:)
Great!! I’d love to see your finished product!!
What color is that? Love it
Thank you Corey!! It is “Peppercorn” by Sherwin-Williams :)
It looks amazing..!!. you mentioned how you’d like to do your whole house, we’ll I DID the whole downstairs of mine and painted every board white… now it’s too white and I need to tone it down. I’d like to use peppercorn for an accent wall and the alpaca for the rest… whawould you do if you did your whole house???
Wow, way to go Keith!! I bet that was a ton of work (and I’m totally jealous)! I’ve always wanted all white personally, and if it can work in your home I’d say keep it white too, especially after all that work. Live with it for a while, work with decor, and see how you feel down the line. In the homes where I’ve seen it done, there is alot of visual interest to break it all up, in the form of architectural interest, unique lighting (sconces, pendants, and even ceiling fans), interesting art and wall decor, and/or furniture pieces that blend with the light and airy feel with having a few warm accents scattered among it. You can see alot of this in my pics of the Coastal Living Showhouse last fall here. Hope this helps, and I’d love to see pictures of it!!
Thanks for the feedback, Emily!! Yes, I did the whole second floor (including the ceilings) and caulked every seam… a lot of work but worth it!! I think you are absolutely right… I was looking at the whole thing with zero artwork on the walls and only a few pieces of furniture; the more things I add to the room the less stark it starting to look. I’m so glad I asked for some pro advice… however, I still think your color scheme is crazy good looking and I just may have to incorporate it somewhere just for fun!! I’d be happy to send you some pics, but not until I add some more stuff… lol!!! Thank you again!!!
Wow, I bet that looks AMAZING!!! Way to go! Please, please, please shoot me some pictures when you’re good to go :)
Keith: I would love to see the pics of your upstairs shiplapped walls, too!! I’m sure you did a great job!
Emily, I just painted my bathroom Sherwin Williams “Latitude” . Want to put ship lap on 3 walls surrounding garden tub. What color should I paint the ship lap? darker gray or white wash? Should I leave raw or put battens on the edge.
What a BEAUTIFUL color for a bathroom Glynette! It really depends on your decor in the space, but crisp white shiplap would look gorgeous with that color in my opinion. I like the look of shiplap trimmed out, so you can use trim like mine (it comes in varying widths) when it’s up against a wall and then if the edges aren’t up against a wall you can use some corner molding as my friend Sarah did on hers: Good luck and I’d love to see a picture of it when you’re done!!
Can you use stain instead of paint
I haven’t tried stain on this material yet Paula, but it seems to be pretty high-quality underlayment so I have a feeling it would take stain well. The material I used for the kitchen shiplap was poorer quality and didn’t have as much real wood grain/texture to it so I don’t think it’d stain very well. Look for good quality material and test it out :)
Emily, this is so so perfect. My husband is gonna hate how much I love this….I’m scheming to see if my very handy 12-year old son and I can pull it off without his help…
Oh, I’m sure you guys totally can! It’s really simple and straightforward and goes pretty quickly.
I love it! It looks so stylish!
Thanks so much Heather!!!
When one of the most talented bloggers I know talks about how “easy” their DIY is… *sigh.* I wish I had your skills girlfriend. It’s so beautiful!
Oh Corinna, a) you are way too sweet, although I think sometimes “talented” is likely just a combination of fearlessness and boredom ;) and b) it really is easy, your planks get cut at the store, so all you have to do is hold them up, nail ’em in, and cut a few of them to do the same. So thank you and go for it!
His is probably a dumb question, but do you only nail into the studs? (This the stud finder?). How did you plan the layout of the boards, in regards to the studs?
Not dumb at all! I taped where the studs were before starting then did two nails in the studs for each plank, but then did some not in the studs near ends or where one bowed out a little or the wall was uneven, anywhere they needed a bit more attaching. We did the layout as we went, basing it on where the planks joined so that would look even moreso than where the studs were since those were plenty. Hope that makes sense :)
So pretty! I love the colors. What is the color you used on the other walls? I am looking for a ‘greige’ type color and I think you have it :)
Thanks so much Liz! The other walls are Sherwin-Williams “Alpaca” which you can read more about here. It was such a pain to find the color I was looking for but I absolutely love it. It looked totally different on the walls in the room than it did at the store, on the can, or of course on the web, so I was kind of worried at first, but it totally worked!
So, I’ve pinned this beacuase, well, it’s amazing. I love the way it turned out and I am in love with the color paint that you chose.
Aw, thanks so much Jessica!! I am head over heels in love with that color too :)
Love it Emily! The color and the texture of the shiplap made such a difference. I’m itching for an entire ship wall in my home
Thanks Deb! I’m itching to shiplap my entire house ;)
You did a beautiful job! It looks amazing! What a great idea to use cut plywood! I would like to invite you to share this makeover at my Making Broken Beautiful party. The party has already started but it goes until Saturday evening, I would love to see you there!
Smiles for a great day!
Terry
Of course! Thanks so much Terry!!
this turned out beautiful and i love the ceiling fan you have in the room with it! i would love to feature your wall if that would be ok please let me know.
lauren
Thanks so much Lauren, I’d love that!
I. love. this. SO. MUCH. This wall seriously makes the room – it looks like it came straight out of a magazine! Gorgeous, gorgeous, gorgeous. And so clever to use the plywood instead of actual planks!
Thanks Erica!!! It makes the room feel so much bigger, and taller, even though it’s a darker color. It’s amazing :)
This wall looks amazing! Actually the whole room does! I would love to do this in my house, but it always seemed like such a daunting process. You make it look easy, and thanks for showing all the steps of the wall in progress.
I thought the exact same and was so surprised at how easy it actually was to do! There’s a ton of tutorials out there but I always want to show you guys how we did it nonetheless, because sometimes a step or two needs to be tweaked (like the baseboard issue) which may be the same for one of you guys too :) Thanks so much Meredith!
Love, love, love this!! What a beautiful guest room!
Thanks Meg! I’m so jealous of our guests :)
Daaaaaang girl! This thing is legit! I’m dying to put a plank wall in our bedroom. I love that you went with the gray. Looks so good with the contrast in the room.
Dooooo it!! This color would look great in y’all’s house too :) Shiplap all the things!
Wow, Emily, this is stunning! What a total and complete difference it makes in the room, and holy cow, THANK YOU for this tutorial. Even though the project is dead in the water, you know that deep down in my heart I still hope to have a mudroom someday. I’m going to save this for when that happy day comes!!!
I’m so happy it’ll help you friend! Shiplap blows me away every.single.time and I am a firm believer that all the walls need to be shiplapped. Spring ORC = mudroom? ;)
This is awesome!! Love it!!
Thanks so much Caitlin, I’m so in love with it!!
Emily,Love this project! My husband and I are near completion of our own wall, following your tute was a piece of cake:) We are nearing the end and are wondering if the seams on your batten trim are super noticeable? did they nicely meet? considering a search for longer trim boards…Cant wait to paint!!
Eeeeee! Yay Julie!! I’m so happy you guys are planking! Definitely send me pics when y’all are done :) The battens lined up nicely initially but then I filled them with wood filler, sanded, and painted along with the nail holes to make them more seamless. I’ll try to grab a close-up this evening and add it here so you can see. Good luck you guys!
As soon as I’m ready to shiplap an accent wall, I’m trying your tutorial! Thanks!
Awesome Teri, go for it!! And pleeeease send me pics afterwards so I can check it out!
Regarding your paint, is it a semi-gloss, satin, egg shell, flat or other? Thanks…
I got the matte finish for mine Linda :)
thank you!!
Starting our plank wall today based on your tutorial. Using 1/4 inch plywood and not removing our 1/2 inch baseboards. Just wondering what thickness your battons were? I’m thinking the 1/4 inch planks plus the battons will be thicker then baseboards – do your battons come over the baseboards a bit where the meet? Does it look fine?
Awesome Alison!! The battens are 1/4″ also so they are flush with the baseboard on each side. I used the same two thicknesses for our master bedroom wainscoting too and a few of them were just a smudge over because the stupid walls aren’t straight, but it’s not noticeable unless you really get down and try to find it. Oh, on the shiplap wall I didn’t put battens all across the bottom, just the sides and ceiling.
Hope this helps, and good luck!! Tag me in some pics so I can see it :)
This looks great!! I’m curious…you mentioned your thickness was too thick??? What would u suggest using to get the “perfect” width between boards?
I used two pennies taped together for the spacing between our boards, but you can use all sorts of other things to get the space you prefer (all different coins, shims, scrap piece of wood, etc). I just didn’t want much of our textured walls to show through so I kept my spaces pretty small. Hope this helps :)
do you have a picture of how it looks at the baseboard? i was wondering how it blends together.
I don’t have a close up picture on hand unfortunately but you can probably get a better look at that area in the nursery photos in this post:
Wow, what a difference that wall made to your bedroom! Love the color you painted it too. Magazine worthy room for sure.
You are so sweet Marie, THANK YOU!!!
I have plaster textured walls….could I still do this to them?
Hi Lisa! Our walls are pretty textured and you can’t notice it between the planks unless you get reallllly close. I am not very familiar with plaster walls, but I would say that if the texture isn’t too crazy you should be good to go. If there’s any exaggerated areas of texture, you could probably sand those down and make it work. Wishing you luck! Let me know how it goes :)
Beautiful! I love shiplap! And Peppercorn! ❤️❤️❤️ Great job :)
Thank you so much Moriah!!!
It’s gorgeous! I want to do this in my son’s room and your tutorial really helps! Great job!
I’m so happy it’ll help you Elaine!! I’d love to see it when you’re done :)
This great! Shiplap is one of the options we are considering for our bunkie.
Oops! *this is great
Thank you so much Cathy :)
Hi, I have an unfinished room over the garage I plan to shiplap. We’ll have to insulate and then does the shiplap just go on top of that or should there be something else in between the insulation and shiplap?
Hi Angela! I don’t have experience with how original shiplap is to be installed, but to do it the way I have (and most tutorials I’ve seen), you’ll need to finish off the walls and then install it. That way there isn’t open air/gaps between the planks. Hope this helps :)
This is beautiful! I have been wanting to do my own DIY ship lap for a while and now you have convinced me to do it! My guest bedroom is actually in our basement and it has no character, no crown molding, nada! I also like how the 8″ size looks! I think we are going to Home Depot this weekend.
Eeeee!! Good luck Yami and please send me pics when y’all are done!!
Emily, the deer mounts are the finishing touch for the beautiful wall….at least that is what I am trying to sell to my wife:)
My wife and I love what you did with the ship lap. We would like to do the same, Ourproblem is we have metal studs. We would like to use 4 x 8 by half inch sheets cut into 6 inch strips. Do you guys have any suggestions how we may do this ?
Thanks you guys!! I think you could still totally do it, it’ll just take a little more effort than if you were able to nail them in. I’d suggest finding a drill bit rated for metal and use screws to attach them (with the smallest heads you can find), countersinking so you can fill and paint over them. You’d probably only have to do one screw every few studs in the middle of the plank. I hope this helps and would love to hear back on it if you try it :)
I’m hooked,Emily. It looks so great! I want to do it in our guest bedroom,too, but we have crown at the top. I can’t visualize what that would look like. What do you think and your opinion, please..
I think it would look just as great Phil, maybe even better :) I’ve seen quite a few shiplap and crown molding combos and it looks awesome, here’s a quick search on Pinterest that may give you some visuals: Please send me a pic if you guys do it!
Emily. ..I think if you start from the bottom and move up…..you won’t have the problem you mentioned down near your baseboard The baton will cover any flaws you may end up with. You did an amazing job and have inspired me to try in my spare room.Thank you for sharing.
That’s another good way to do it Dani, but unfortunately we have unevenness at the ceiling and the baseboard so it was one or the other, and it was better up at the ceiling so I trimmed it out up there :/ At least the unevenness at the bottom is hidden by the bed. It’s a good suggestion to compare where there may be issues and work around it that way :)
Love this tutorial, going to do it in my family room. This may seem a silly question. When you had the sheets ripped down, did you cut the 4 ft side or the 8 ft side? And if you cut the 8ft side, how did you decide what lengths to use on your wall? My wall is 18 ft so it would only take 2 and little bit to cover
Great Amy!! We had them cut on the 4′ side so our planks would be 8′ long. We started at the ceiling with a full-length piece on the left side and cut as needed after that. I selected where other full boards would go randomly so the seams wouldn’t be lined up anywhere and there wouldn’t be any pieces less than about 2′ anywhere either. I didn’t have it mapped out ahead of time, just eyed it as we went. I tried to utilize all the pieces we had but had some left over that just didn’t fit quite right. You just kind of play with it as you go and do what looks right to you, like a big game of Tetris ;)
What an inspiration. I feel like I could follow your tutorial and be okay. Your idea has lead me to create a master bedroom inspiration board on my blog. I went ahead and linked your site. Hope that is okay. Thank you for putting together an awesome visual tutorial.
Of course!! Your space is going to be so tranquil and pretty Kelli, that inspiration board is gorgeous! Definitely let me know how it goes and I’d love to see after pics!!
Hi Emily,
What color are the other walls in the room? Curious because we’re doing a shiplap accent wall in our entry way right now, and we were going to do white, but are now considering a dark gray. Our walls are a light gray color right now. I’m just trying to find different examples of what it might look like. Thanks!
The other walls are Sherwin-Williams “Alpaca” which is sort of a light gray/taupe. It looks really good up against our “Peppercorn” so I think a dark gray would look great with your light gray walls, as long as both are the same warmth (both cool grays or both warm grays). I’d love to see it when you’re all done :)
Do you have a step by step available? I can’t find it.
Hi Cheryl! I did not write out a numbered step-by-step since the post is written in order of how we completed the project: level, nail, cut, (repeat dozens of times), prime, paint then nail trim. The photos and commentary are exactly how we went through the process and I hope they help you. Please don’t hesitate to shoot me a message if you have any questions about any of it though, I’m happy to help!
we are considering do this in a family room but two opposite walls are vaulted and go up to a point. Would you suggest going up to the top??
I think having it carry all the way up with some faux wood beams would be gorgeous Sally! But I know that may be quite a feat so otherwise just doing the walls and finishing them off nicely with some trim or crown molding will still be beautiful.
I just started putting up the first few planks and I’m getting a gap from the ceiling to the plank as I go. My ends are flush. Did you run into this problem?
Hi Shannon! Yes, our ceiling wasn’t super straight either (grrrr), so we just made sure that the board was level then used the battens at the end to help cover up most of the inconsistencies at the top and on the sides. There’s still little gaps here and there at the ceiling but you can’t tell at all. Hope this helps, let me know if you have any other questions!
We just did this in our bedroom. It turned out great! I painted between the penny gaps and all edges so no white would show through. We also took it down to the floor and put the baseboard over it.
Perfect Kathy!! I definitely prefer the baseboards-over-planks if it’s possible :)
Somehow I just found your amazing blog and this post. LOVE all of the things! I am about to install a shiplap backsplash in my kitchen using this same method. Can you tell me how you handled the plug/outlet issue? We have 3 to cut around, and using the 1/4″ plywood will help since it’s so thin, but I feel like they’ll end up being too recessed with an additional 1/4″ of material for the switch plates to mount onto, if that makes sense. Did you run into this, and if so, how did you handle? Thanks! And cannot tell you how completely smitten I am with your blog. Glad it’s Sunday morning and that I have a full pot of coffee!! :)
Hi Amy!!! I’m so happy you’re here, and Sunday is a good day for binge blogging ;) As for the shiplap, we made it where two planks ended over the outlet so that it’d be easier to make the cuts (we wouldn’t have to jigsaw an entire hole, just two cuts). The planks didn’t add too much depth to where I needed to use any outlet extenders, I just found some longer screws to use and that worked fine. If you need to though, you can see how I used the extenders when we did our wainscoting here (oolllllddd post, ignore that crappy photography, eesh!) Good luck and let me know if you have any other questions! Oh, and please send pics when you’re done!
Thanks Emily!! Soooo helpful!! :)
Of course, can’t wait to see it!!
Hi Emily love, love, love it I am doing this in my daughters room. What color is the ceiling? Did you paint it Alapaca or white? I also wanted to know where you got the mirror?
Yay, great Alice!! The ceiling is just the original white from when we bought the home, and the other three walls are Alpaca. The mirror was a clearance score at HomeGoods but I often see similar ones at Wayfair and Joss & Main. Good luck, I’d love to see it when you’re done!!
I’m sure you have answered this several times but I didn’t see it any of the comments above (my phone is being kind of quirky)… what was the total cost of this project? I want to do this to my living room :)
Hi Brie! The only supplies we needed for our wall were the sheets of the plywood and the paint so it came in around $100. The sheets are $13 a piece plus about $3 total for them to rip them into planks for me at the store if I remember right. Our wall took 5 planks total (dimensions of our wall are in the post). I used a quart of Sherwin-Williams’ Duration in Peppercorn which was maybe $20 or so with a coupon. I had most of the other supplies (primer, paintbrushes, spackle, saw, levels, stud finder, nail gun, etc.) already but of course factor those in if you don’t have them on hand. Oh, and $0.06 for our penny spacers :) Let me know if you have any other questions and good luck, I’d love to see it when you’re done!!
Amazing work! We are thinking using this product to cover popcorn ceilings, not sure if this is a food idea?
This would be a PERFECT way to cover popcorn ceilings!! In fact, one of my good blogger friends Kristi from Making it in the Mountains just did something similar to her ceilings, check it out HERE!
Hi Louise, we are about to cover our popcorn ceiling in our family room and I was wondering how yours turned out. Any way you can share tips and pics?
Hi There,
So since I am not handy at all, I am hiring a contractor to shiplap my kitchen. The plywood would be a cost saver for sure, but it is only sold up to 8ft. One of my walls is 12ft, so this means I’ll have some vertical lines too. Did you encounter this? I checked your pics, but i do not see this happening. Any suggestions? Should I opt for more expensive wood, if so , what kind? thanks!!
Exciting Carlos!! Yes, the plywood I used only comes in 4’x8′ sheets so we had vertical lines at the ends. You can see some of these joints in pictures 1, 4, 9, 12 and 14 if you look closely (this one and this one are the best to see it in) and I talk about how we handled in the first paragraph under “How to Install”. We started with a full-length board at the top right corner, then continued from there. When we had to cut a plank, we just made sure the vertical joints would be staggered and that there wouldn’t be any pieces too small. It was easiest just to plan it out as we went. Let me know if you have any other questions, and good luck!!
I am planning on doing this in my sons room as half walls. A few questions-I was thinking I should paint the planks first before hanging. Is that wrong? Also I’m use white chalk paint-do you think I should still prime? Thanks! Yours look amamzing!!!
Awesome project Melissa! You can definitely paint the planks first before installing them, I just didn’t because I knew I’d be having to go back and paint over the filled holes as well as in between the planks and I didn’t want to mess up the finish. Either way would work but I lean towards painting them on the wall. As for the primer, if you’re using the same underlayment material that I did it would probably be fine to skip it since the material is very clean. I always just err on the side of caution and go ahead and do primer just in case, but with this material it would probably be okay if you didn’t want to. Good luck and I’d love to see it when you’re done!!
Hello Emily,
I have a bedroom I wished to shiplap one wall. Thank you very much for your tutorial. It will certainly help! What width did you cut the piece at the ceiling and the two walls? It looks like it may be somewhere between 2 or 3 inches, I’m guessing.
Also, the ceiling in this room has those awful fake tiles made of cardboard or something like it which they used to put in drop ceilings mostly in basements but this one is upstairs. I hate it and I do not use the word hate loosely. What is your opinion on what it would look like if I did the end wall facing you as you walked in in the shiplap PLUS the ceiling? Do you think it would be too much? If you think it would look good, would you border it with another 2 or 3 or whatever inch pieces around the 4 walls of the ceiling as you did the walls?
Thank you for you help.
I genuinely appreciate it,
Linda
Hi Linda! The trim pieces at the ceiling and walls are the 3″x1/4″x4′ poplar “hobby boards” linked in the supply list. We had them left over from our bedroom wainscoting project and they ended up being perfect to trim out the wall. As far as the ceiling situation, I don’t blame you one bit for wanting to get rid of the tiles! If there are supports behind it that allow you to nail the planks up, I say go for it. I’ve seen beautiful spaces with both planked ceilings and planked walls in the same color (like this: , but it all depends on the decor and how thick the trim/molding is in my opinion. There is also the option of doing a painted shiplap against stained shiplap just to create some interest, like here: https://www.pinterest.com/pin/220817187956446207/. Either way, if there are planks on the ceiling and walls, I would make sure to have both of them trimmed out and it’s probably easier to install crown molding to achieve that than adding a bunch of the battens. I wish you tons of luck and would LOVE to see the finished space!!
hi…just happened to be looking for shiplap TRIM ideas and came across your blog. Started reading the comments !! your work looks great !! I am redoing our master bathroom and decided since the walls are so wavey that tile won’t work so i decided to go with shiplap…..i used 7″ tongue and groove…the look looks like yours. My ceiling was worse mess than the cardboard tile lady’s so i added furring strips and did narrow “shiplap” tongue and groove.
My walls have the boards going up about 56 inches…..the top part is painted. I am whitewashing the ceiling shiplap to give a little different effect. My wife is LOVING the look and i am no where near done !!!
Thanks for your info !!!
Awesome job Daniel!!
Emily –
Just what I need to do an entry hall with cracks in the sheetrock due to foundation movement. Question: why the spacers? Why not butt the boards, being sure they are level? The seams are going to show regardless and you’d still get the texture on the wall.
Thanks,
Carol
Traditional shiplap has a slight channel between the boards so the spacers were used to achieve this same look. It’s just personal preference, they can be butted up flush to each other if you’d rather do it that way.
This is gorgeous and you made it so easy and accessible I might actually give it a try!! I actually noticed your flooring in that bedroom and fell in love. Do you mind sharing the info on it?? Thanks! Great blog!
Thank you, definitely go for it Kate! And our flooring is a handscraped laminate by Armstrong in a driftwood finish. We put it down about four years ago. Looks like Wayfair has it:
I’m really interested in doing this project. I just have one question did you use a 18 gauge or 16 gauge brad nail gun ? Do you think either would work ?
I’m sure either would work. For this wall, I can’t recall what gauge that nail gun was, but I now have the Ryobi Airstrike and it is an 18 gauge and worked great on the shiplap in the kitchen I just did.
Emily,
Need advise on the wall color of this place we are building. Keep in mind it’s 24 wall height and we want shiplap ceiling. And we like not love the DEA of a light green or blue especially with the high Windows not having coverings to flood us with natural light. One last need it for the island countertop color???
Hi Debi! A shiplap ceiling sounds beautiful! I’d love to help and give suggestions for wall and countertop colors but everyone’s tastes and styles are so personal and different, it would really help to have some pictures of the space and an idea of what decor styles you guys prefer. If you want to email me some at emily(at)tableandhearth(dot)com, I would be happy to come up with a few suggestions :)
Thank you so much for the great tutorial! I completed my wall this weekend. It took two days as we had a fireplace, beams, and window to work around. i just gave it the first coat of white today, and I love it!!!!! I cant believe how great it looks. Thanks again.
AWESOME Tracey!!! It sounds beautiful! Please, please, please tag me in any pictures as I’d love to see it <3
I’ve been reading the comments hoping someone would ask about white! Do you have any pictures of this done in white? I’m looking to do a mudroom.
Thanks!
Yes! I did it in white above our cabinets for our kitchen makeover (more pics HERE):

Emily, just found your blog after googling “how to install shiplap.” What a transformation! The room is beautiful and the color is gorgeous!
I have been dying to do this for a few years now but have been too chicken to try it because I am just sure I’d end up with a disaster on my hands. I am not a particularly handy person, but your post has me feeling brave!
These are probably dumb questions, but did it just work out so that your bottom plank was also 8″ wide, or did you end up needing a thinner piece? If so, did you know ahead of time what width plank you would need, or did you just get to the bottom and determine what width that last plank would be? Did you cut it yourself? One of my concerns is that I’d get down to the bottom and need a 3 or 4″ plank and without a saw, I’d feel kind of silly going down to HD to have them rip just a few 4″ pieces. (Does that make sense?)
I don’t have a saw of any type, but could pick up a mitre box and saw – is that all I would need to cut the planks and battens? Is it also all I need to make cuts for outlets, etc.?
And what is the speed square used for?
Hmm, reading my post, it is apparent that I am pretty clueless. Should I take a carpentry class before trying something like this? So many of the folks that have done this all seem to have at least rudimentary carpentry skills, but it really does look like something that is doable!
Thanks for any advice you might have,
Kaille
Hi Kaille! I promise you can tackle this project :) To answer your questions:
1. As far as the bottom plank, it had to be shorter than 8″. See the “*panel PSA” section in italics on how we handled that.
2. You could definitely do it with a miter box and saw but I would strongly suggest investing in at least a circular saw or jigsaw to make it go alot faster. I have links in the supplies for ones I recommend and there are many quality models out there for well under $50.
3. The speed square is for marking your cut line on planks
4. A carpentry class is not at all necessary, just practice with your tools until you get comfortable. The tools used here are very easy to use and just take a little bit of practice, as with any DIY project.
I hope these help get you started and if you have any other questions, please feel free to email me! Good luck!
what is the flooring in there?
It is a handscraped laminate by Armstrong in White Wash Walnut (affiliate link: We removed the carpet in all our bedrooms and had this installed a couple of years ago and it has held up PERFECTLY. You can find more pictures of it in the other bedrooms on the Our House page.
How do you install shiplap when the top of wall is slanted. How do you start
With a slanted ceiling you can either start at the ceiling or the baseboard and just cut the planks at the angle you need to meet the ceiling where it starts to slant. There are many diagrams and videos for calculating what angle your ceiling is at, but the easiest way is probably just to use a piece of paper to create a template to cut the planks by. If you mean your ceiling is just slightly slanted as in uneven, then you just want to make sure the first board you place is level and go from there. Hope this helps :)
Hi Emily,
First off thank you so much for sharing it looks fantastic. I had two quick questions as I’m going to give his a shot in one of our rooms
1) When you get the planks cut down to 8inch thick did you have the boards cut long way(8ft) 94 short (4ft)?
2) the wall I want to do this to has a window so should remove the existing moldings, go flush to the window and do your board treatment to it? Or any other ideas you have would be greatly appreciated
Thank you so much, I am an new homeowner and a. We DIYer so any recommendations or guidance would be greatly appreciated.
Thank you
Happy planking Chris!! As far as your questions, 1) I had them cut longways (along the 8′ side) so that there would be less seams on the wall. You can definitely go on the short side if you like alot of seams or don’t want to mess with long planks 2) if you use the 1/4″ material like I did, it should be much thinner than the molding around the window so it can go flush against it and look fine (like I did on our baseboards). To me, I would just go flush against it and not have the added work of putting the molding back up. Good luck and let me know if you have any other questions!!
Thank you so much Emily you are the best
Hello, you seem to know your colors so well. I am using ship lap as well on wall however stuck on what colors to paint , I have a black ceiling molding and I have light maple floors.
It’s a salon with ten foot wall and I have brown walnut stations . There is some brown grains in the floor. I am stuck on what color to do the walls. ?
That sounds like it’ll look great! Paint color really depends on your personal style and the style of the room though, but just from your description I’d probably go with a basic white to let the molding and wood tones shine. If you want it to be a color though, you can email me some photos and I’ll happily make some recommendations :)
Hello Emily,
Thank you for this post – we overspent on our new house and now my bathroom’s gotten the short end of the stick. Seeing how your room was transformed for an affordable budget inspired me to do the same for my poor plain bathroom!
I have a technical question. Let’s assume my ceiling is not level. The point would be to make sure the planks ARE level and neat. Therefore, I would have to trim where the top plank and uneven ceiling meet, according to the way the ceiling dips and rises. Is there an easy way to do this?
Next – when I fit the battens on – do I have to do the same thing to the battens, i.e. trim the side that meets the ceiling so it’s seamless? This sounds like a horror considering I am a complete noob at the saw!
I’m thinking of cheating – if I level the top board nicely and leave some minute gaps between that and the ceiling, and do the same thing with the battens… ain’t nobody gon’ get hurt, righhhhtt?
Thanks in advance for your reply!
Oh man, none of our ceilings are level either! This room wasn’t too bad but when we added shiplap in our kitchen recently there were much more pronounced “waves”. We did just as you are suggesting, level the first board and go from there with the planks, then the trim we just leveled up as well. You could caulk any gaps at the top before painting if you really wanted them to go away, but honestly I don’t notice them unless I look up and focus on it so we never did anything. So go for it, and send me pics when you get it all done!
YAY so no precarious cutting of planks to fit wavy ceilings. CAULK is really like duct tape isn’t it? I was just reading somewhere else that using plywood underlayment in a bathroom was a bad idea – so I figured perhaps painting with (at least) a semi-gloss enamel paint or even an outdoor paint should protect the wood from bathroom moisture? What do you think?
No, nobody wants to do that crazy cutting! Caulk is always a miracle worker for sure. Yes, the underlayment is a little risky in a bathroom especially if it’s going to get splashed or have moisture on it after showers and such. If it is, I’d definitely use a paint that is made for damper areas (SW’s Bath Paint is one) or an outdoor paint. You may could even poly over the interior paint or even smoosh some clear silicone in between the panels to help protect it further. I’ve never used it in a space where it would get damp so these are just my first-off ideas of what I would try or ask about.
Wonderful. Thank you so much for your help and advice! I’m writing a plan and sending it along to my partner-in-crime now… before and after photos are definitely in order!
Sending you all the kickass shiplap vibes!! Can’t wait to see it!!
Oh my gosh this room is absolutely breathtaking I am crazy for shiplap and the color gray beautiful and you can put just about any other color with gray But my favorite are the Seaglass colors any of the turquoise just absolutely beautiful, awesome thank you Emily
Aw, thank you Hazel!!
I want to shiplap my utility room. Our sheetrock walls are in awful shape, so I was going to paint them first with the same color I plan on painting the shiplap strips. I am painting the strips Behr’s Loft Space. The walls are currently Sherwin Williams Killem Beige. If I DON’T first paint the walls, would the spaces (using one nickel spacers) be seen and create a striped effect? I certainly don’t want that. Did you consider painting the strips before putting them up, then retouch after nailing etc.? I am a senior, trying to do this correctly but on a budget since I am on a fixed income! Help!!!
Our walls are SW’s Alpaca and I did not paint before I added the shiplap, I just used a small brush to get in the gaps. It worked well but was pretty tedious so if I were to do it again I’d probably just go ahead and paint the wall. The gaps are pretty thin so it’s likely you wouldn’t really be able to tell unless you were up close, but to be safe I’d suggest painting the wall first. And no, I did not want to paint the planks beforehand so that the finish would be as smooth as possible plus it was much easier and quicker to do it when it was all up. I did paint the trim pieces before installing them and then touched up so I didn’t have to worry about taping off the walls and ceiling. Hope this helps. Good luck!!
This shiplap looks amazing! We plan on doing shiplap in our living room for sure and possibly the dining room and master. Is there such a thing as too much shiplap?
We also thought about doing a vertical nature wood wall in the dining room with a darker teal for the other walls. What do you think?
Thanks Krystal! And no, no there’s not :) A wall like that in the dining room sounds really cool, I’d love to see pics when y’all get it done!
hello! i just found your blog a week ago and i have been obsessing over this post! we just got all the supplies to do a shiplap wall in our entry room! wondered about how many nails you used for each board and how much paint you went through for that wall?! it’s just beautiful and i’m hoping ours turns out just as great! thanks for sharing!!
Awesome Brittany! I would say there’s probably six nails at most in each board? Two at each end and a couple spread throughout the middle into studs (depending on how long the board is). As for paint it took not quite a quart of SW’s Duration paint and that was with primer and then two coats. I can’t remember off the top of my head the dimensions of the wall but maybe 8’h x 16’w? Good luck and I’d love to see it when you’re done!!
Help! I want to do this in my basement, but only only have masonary block walls to nail it to. Trying to avoid building a frame. Any suggestions?
Hmmm, I don’t have any experience working with masonry walls unfortunately. Building a frame would probably be easiest, yes, but I asked some friends who have worked with them more and they suggested masonry screws or a concrete construction adhesive like LiquidNails or Loctite. Sorry I’m not much help :/ I’d love to hear what works though if you get it done, good luck!!
I love your floors in the one picture! Would you be willing to share where you got them and the style name?
Thanks so much Melanie, we love them!! They are a handscraped laminate by Armstrong in a Coastal Living “White Wash” finish that we had installed about five years ago by a local place but here’s a link to it also at Wayfair (affiliate link):
Hi Emily! I love love love how this turned out! Just a quick question. The only type of saw I have is a Worx circular saw. Would that would that work ok? also…I would be doing 3 walls instead so would you suggest putting the trim on each wall or leaving it off in the corners?
Hi Keilah! A circular saw would totally work, just try and get the straightest cut you can on them. I use one of these guides that attaches to my circular saw when I need it to cut straight (aff link): , so that may be an option to make it easier. As for the walls, it’s totally your preference but if it were me I’d trim each one out just so you don’t have to worry about irregular edges :) Good luck!!
I have a question about the plywood. I’ve heard it can warp after a while. Has yours warped at all? Do you live in a humid or a dry climate?
Thanks! This looks so beautiful!
Hi Sherry! I live on the south Texas coast so it’s definitely humid here but we haven’t had any issues at all with it now for almost two years, it looks just the same as when we put it up. It definitely isn’t good for outdoor projects (a scrap we had out disintegrated pretty quick) and I’d be hesitant with it in a steamy bathroom, but for a regular room it’s done great.
Do you know a rough estimated price for this project?
It will all depend on how big your wall is and what tools you already have on hand of course, but for our wall it was about $60 for the plywood, maybe $20 for the trim battens, and $50 for the paint and primer. I had the painting supplies, stud finder, filler, speed square, jigsaw, and sander already but bought the nailgun (~$150) for this project. So basic supplies would run a little under $150 for this size wall trimmed out then just add on the cost of any tools and supplies you would need to get. Hope this helps!
fyi update home depot amd lowes will no longer do any cuts under 12 inches..? i loved this idea so much i went there to get started on the project and was told by mgmnt they won’t cut the strips smaller than 12 in for their safety. So needless to say i bought a table saw and did it my self!
Oh how frustrating! As of last June our local stores still would but I haven’t asked since then. But, that’s always a good excuse to get your own table saw ;) That’s definitely next on my tool list!!
I work at a Home Depot and had a gal come in today wanting to do this darling project. But my store won’t allow cuts less than 12″ either.
Halfway through with my guest room! I had four sheets of 1/4 inch plywood cut at my local Home Depot today, with no restrictions on the width. (They cut each 4 foot wide board into six 7 3/4″ planks, with a 1+ inch strip leftover which will be my frame battens.) The first two cuts were free, but they charged 50 cents for each additional cut. Be sure to check with your local Home Depot or Lowes before starting any project … I had my wall all marked up for board and batten, only to learn that my Home Depot won’t cut any MDF (fiberboard) because it ruins their saws. SO, a quick change in plans from board/batten to shiplap!
Awesome! That’s good to know about the MDF, that stuff is a mess. Shiplap for the win!
Can we just nail the boards to the 2×4 studs……on an interior wall?
Yes, that is what we did but used a nailgun to do so, plus a few extra nails on the ends (not in a stud) to keep the ends from bowing out.
Did you use any liquid nails? We are doing this today and I have seen people use liquid nails as well as nail.
I have seen that too but no, we did not. Our studs are 16″ apart so our boards were flush and sturdy just with nails into the studs. It couldn’t hurt though if you wanted that extra security, so totally your choice :)
Hi Emily,
Thank you so much for this post. I did the project this weekend exactly as you directed even used SW-Peppercorn for the color, and it came out perfect! Such an awesome look for a weekend project under a hundred bucks. If I had to do it over though, I would have taken a little extra time and put up a quick coat of paint on the wall under the boards. The white wall showed through in some spots and it bugged me. I think also I might have taken the time to paint the boards first since it was kind of hard to get the paint in that little nickels width between the boards. It was super smart to paint the decorative finishing pieces first before nailing up to the wall. Saved so much time not having to tape all the walls, ceiling and baseboard. For anyone thinking of doing this project, please note that although I bought glue for the back of the boards, I did not end up needing it. This was a big plus if you ever want to take the boards down. Less damaging to the wall without the glue. I was a little scared when the boards were up and no paint was on. It looked funny and I was afraid it wasn’t going to look like the pictures in this post, but rest assured, once the paint was on it was perfect! Thanks again!
Oh I wanted to add that I went to Lowe’s and they gave me a little grief about “not doing project cuts”, but the guy who works there cut the 4 boards I bought into 6 inch strips for me anyway. So I guess it depends on who you get and if it’s a busy time of day or not.
I agree, there doesn’t seem to be a rhyme or reason to when, who, where, or why they will or won’t do the cuts :/
SO SO SO happy to hear this, I bet it looks amazing! It is a pain to get in between the boards so painting the wall before definitely saves some headaches :) I’d love to see pictures of the finished wall if you have some to share. Way to go y’all!!
After you bought the wood from Home Depot did you let it acclimate before hanging?
I don’t want it shrinkin once it’s already on the wall.
Yes, we brought it inside and let it sit for a couple days. Although for the shiplap we did in our kitchen last year we did not and it hasn’t shrunk. It’s definitely a best practice though.
What’s the paint color of the other 3 walls in the room and who makes the paint? I love how the walls go so well with the shiplap.
Thanks! The other walls are Sherwin-Williams “Alpaca” :)
Hi, I’m writing a blog post about beach themed decor for an RV makeover blog I’m starting. Would you mind if I included one of the photos from this post, with your watermark, and a link back to this tutorial? Thank you in advance for your response.
No problem at all! Thanks so much for asking Ashley :)
Thank you!
Love this! I used your blog to help me with my daughters room this weekend. It looks great, except I haven’t done the trim yet. Can you tell me on the poplar battens, what size did you use? It looks like there were pieces, and on the link you posted most are 4 feet in length. Did you caulk them or what did you do to prevent the look of seams. Thanks!!
Yay! I’m so glad it’s looking good! The battens I used are 3″ wide and yes, 4′ long so I used wood filler in the seams, sanded, then painted over it. Hope this helps :)
Is it all the same color or is it just the shadow between each board that makes the gaps look darker? It almost looks like two seperate colors…
I want to do this as a surprise for my wife in our new house! Wish me luck! #thanksjoannagaines
Such a sweet surprise JP!! The wall is all the same color so it must just be some shadows during photography. I painted the gaps before painting each plank. Good luck and enjoy the new home <3
Hi Emily, thank you so much for all the great help…I want this same plywood wall in my rather dark family room, but I want a grayish whitewashed look…how would you do that to this plywood? Thank you, leslie.
That sounds so pretty Leslie! The plywood I used received stain when I used it for another little project so I think as long as you find a good quality plywood like it, you could stain with a gray and then whitewash or use a wood aging product like Weatherwood Stain plus their white oil to create the look (see these used on my mantel project HERE). I’d love to see it when you’re done so please send me some pics, and good luck!!
can shiplap be used for shower area.
Linda, if you are meaning in the actual shower stall area, no, I would not suggest it. However, it can be used on bathroom walls as long as it is properly sealed and won’t be exposed to excessive water. Here’s a good tutorial for planking an area such as this:
Hi Emily,
Everything you did looks gorgeous including this tutorial, and you have encouraged me to do something like this. It is my first time that I will do something like this, so I have some questions for my project to be done on the weekend.
1. Your battens are 1/4″x3″x4′. Are the 3″ because of your board on the floor is 3″? My boards are 4″, so I do not know if it is a good idea pick battens 1/4″x4″x4 ft..
2. I do not have a corner cat sander, so I was thinking to do it manually. Think that it is my first time, so no tools more than screw driver I have. Do you recommend to buy it or keep it manually?
3. The wall to work on is 10’x10′, so I was thinking to put up the first line of planks from left to right (8′ then 2′). Second line from left to right (2′ then 8′) and so on to give that staggered look. However, I think it does not give that look at all. What would you do?
4. Did you cover floor and baseboard when you painted it? (I am new new)
5. Battens are 4 ft and my wall is 10′, so do you think that using wood filler, primer, and paint is enough to cocer the little gap? (You called them edge or knots)
6. I will use from somebody a pneumatic nail gun for 18 ga brad nails (including a small air compressor). Do you think I have to consider something else with the pneumatic nail gunner?
7. Where did you get that mirror on the wall?
8. When did you use the speed square?
I would appreciate any help and I will let you know how a person without experience ended it up.
P.S. I read all comments and somebody commented about the plank cuts in HD. I did not have any problem; however, I see a sign in HD saying that they did not cut less than 6″.
Hi Raul! You’ve totally got this :)
1. I did the 3″ battens because I had them left over from a previous project. You could use whatever width you think would look best.
2. The underlayment I used was really smooth so the only sanding it needed was on any edges but I still always recommend a palm sander because they are SOOO much quicker and easier to use.
3. We worked left to right, starting with a full 8′ board and then decided what sizes to use next randomly from there on. We really just winged it to get the staggered look I wanted while making sure not to have any too-small sections. I didn’t make any sections shorter than 24″.
4. I had a canvas down over the floor while I painted, yes.
5. Filling the gaps between the trim pieces doesn’t take up much wood filler as I put them as flush together as possible.
6. That pneumatic nail gun will work fine, that’s the kind we used when we did this project (I upgraded to the compressor-less Ryobi Airstrike after this)
7. The mirror was a clearance find at HomeGoods a few years ago
8. I used the speed square to mark my cuts so they’d be a straight 90 degrees
I’m glad your HD did your cuts for you, it makes it so much quicker!! Let me know if you have any other questions and definitely show me your finished wall :)
Hi Emily,
I am alomost ready to start with this project during the weekend. I have painted the battens already and all material are waiting for me. Just two more dumb questions:
1. Did you leave a small gap between the horizontal planks (vertical gaps)? I think you said that you eyeball them leaving a space?
2. I read a comment where you explained that using a larger screw was enough for the outlets because planks are not so thick. I am just worried about connecting a device and oulets will go in the walls. Could you please help me to understand how outlets will be steady without any extender?
Thanks for being so nice. Btw, nice burcher paper food list :)
Not dumb questions :)
1. Yes, I left a small vertical gap between the planks so that you could see them. This is totally personal preference and if you want a more seamless look you can put them flush then fill, sand, and paint over them.
2. We tried to make it where actual outlet overlaps the plank so there is no movement, but feel free to grab a package of extenders if you want to be sure.
I was so excited to do this for our new mudroom. Still am actually. But we hit a hiccup in our plans. I went to buy the 5mm underlayment from lowes and have it cut. When I got home we realized the boards were all cut cock-eyed. After arguing with the associates on why we should be able to return wood they cut wrong we are hesitant to try having something this thin cut again.
I’m so sorry that happened to you Sarah, what a pain! I have had this underlayment cut at the store for two projects now and knock on wood have never had an issue. Hopefully the store and associates learn to cut it correctly now so others don’t have the same problem :/
Hi Emily,
I am SO excited that I came across your tutorial today! I LOVE the way your shiplap wall looks – it is awesome!
We purchased a small cottage on a lake in northern Wisconsin. Starting next week, we have contractors building an addition with a full basement (right now we only have a crawl space). Currently, this is what we have: hand-scraped hickory floors, hickory walls and hickory kitchen cabinets – we have hickory everywhere!! The two bedrooms are the only places where there isn’t hickory (thank heavens).
I was explaining to our contractor how I wanted one wall in our enlarged master bedroom to be shiplap. This would be the wall where the head of our bed will go. However, after reading your tutorial and if my husband agrees, I think I’ll do it myself!
I have a few questions for you if you don’t mind:
1. You use the acronym PSA – excuse my lack of knowledge but can you tell me what it stands for?
2. I plan on painting the shiplap black (I’m going for more of an industrial decor), would you suggest I primer and paint the wall black before putting up the shiplap?
3. I was thinking about painting my upper kitchen cabinets white and leaving the lower cabinets like they are (plain hickory) – can you please give me your opinion on this? Do you have another suggestion for paint color?
4. The living room has a fireplace that almost matches the floor! It looks like a light colored sandstone. Any suggestions for updating that look?
I will attach pictures of the existing cottage to the email I’ll send you so you can see what I’m working with!
Thank you for all of your help!
Hi Susan! Just replied to your email with all these :)
Thank you for this. Very helpful. I plan to use nickels (single) as spacers. Do you think it’s necessary to lightly paint the wall that I’m covering up or would the gaps be narrow enough to hide the color behind the shiplap?
The gaps were pretty visible so I’d say go ahead and paint the wall just to be sure, it’s a pain to go back and do it with the planks up. Good luck!
Thanks!
What type of primer did you use? Me and my wife finished all the steps right until the prime. Did you prime the entire wall? And prime the gaps as well? Your room looks great! Thank you!
I used Zinsser primer (if you click on the word “Primer” in the supply list it’ll take you to the one I use) and no, I did not prime the wall since I was leaving the wall its original color. I did prime the edges/gaps of the planks as you can see in the 6th picture down, and did one coat of primer and two coats of paint.
Thank you so much! I kinda messed up when asking my question. I saw you primed the gaps on the planks. Did you prime the actual planks themselves? Like the entire ship lap wall? Or just the gaps of the wall? Thank you!
Yes, I primed all of the planks along with the gaps after filling the nail holes. You definitely want to prime all of them so any knots and such won’t bleed through.
I’m doing his today in our kitchen with a nice fresh all white look. While your room is amazing, I’m actually more impressed that you have responded to nearly all of these messages over the past 2-3 year lol.
Thanks for the awesome tutorial!
Ha! I just want to make sure everyone gets their beautiful shiplap wall <3 <3
Hey Emily
Getting ready to put up my planks. I was worried about my pieces bowing with the studs 16” apart. Did you use adhesive on your planks too or did you just put the up with a nail gun? I have my studs marked and the underlayment plywood cut. Our downstairs bathroom has the worst uneven texture so I decided to just shiplap the whole space.
Hi Julie! Nope, we didn’t use adhesive on ours and haven’t had any issues with bowing at all. We did put a few extra nails here and there in between the studs just in case too. Good luck!!
I’m sorry if this is a repeat question, but if I wanted to do this on my ceiling (new construction) what would I put behind it to cover the studs and insulation?
Hi Lori! If you are using my method for shiplap you would still want to put drywall or other covering on the ceiling as the planks are very thin and do not overlap. Since you are new construction, having true shiplap installed would be an option though if you want to discuss it with your builder.
Did you use the matte finish on the peppercorn walls as well?
Yes, the Peppercorn wall and I believe the three Alpaca walls too are all in the matte finish.
Hi Emily –
I love this and would love to replicate it for my home. Quick question – is this reversible, just in case.. ;)
If you don’t use any glue I guess it could be reversible if needed, although it would involve lots of muscle to pry it off, filling TONS of nail holes, and likely some drywall repair.
Do you think this could be done in a bathroom? Specifically on the wall behind the sink?
It can definitely be done in a bathroom, you’ll just want to make sure you use paint made for damp environments (like Sherwin-Williams’ Duration or Emerald).
Hey there
Looks beautiful! Im wanting to do this and also put up some shelves on the shiplap wall, but my concern is that the shiplap wall might rip off if I put shelves up on it… I see you put a heavy mirror on your shiplap wall, do you think putting shelves on the wall would be ok as long as I use the stud finder?
Yep! Shelves would be totally fine Erin as long as you attach them in the studs. You could also try to use anchors in the wall (where there’s not a stud) in between the planks if you want some extra strength, that’s how that mirror was hung since there wasn’t a stud where I needed it to be.
I found your post, sent it to my husband, nagged for a few weekends and we just finished doing this in our bedroom too! We followed your instructions right down to purchasing the same nail gun and two pennies as spacers. And I… LOVE it!!! Doing this in a wall in the basement next weekend. Thanks for sharing & inspiring!
Way to go Kathy!!! It’s such a great project, huge impact for relatively little work <3
Hi Emily!! I love it! Thank you for the awesome post and how to instructions!
I just bought my 1/4” plywood and cut it into 7” strips. I am still unsure whether I’m going to keep them natural with a light stain or paint them. I did paint the wall behind it white.
Do I need to paint the edges of the boards? My concern is because it is much thinner than typical ship lap, you won’t get that shadow in between the boards after you paint, or will you? I saw in your post you stated:
“I didn’t paint the edges of the planks cause I knew I’d be trimming it out with some the poplar battens I had left over from my wainscoting so I didn’t bother. “
I don’t know what ‘poplar battens’ are but I’m thinking we might be talking of different edges? I’m talking the cut edge on each 8’ plank, maybe you’re talking at the wall edge?? Any suggestions would be appreciated. I bought some gray paint and started painting the 1/4” edges, and it’s very cumbersome and time consuming. I’m wondering if it’s even necessary? I wish I could figure out whether I want the planks white or natural, that would certainly help too! Thank you!
Oh yes, I was referring to the vertical edges where the planks meet the wall. Since trim was going to frame the whole wall I didn’t bother to paint where trim would be covering up. I did paint in between planks horizontally (where they were ripped down) as best I could. I used the smaller 1″ brush for that task and it worked well. Oh, and the “poplar battens” were just 1/4″x3″ strips of poplar that I’ve used as vertical battens in board and batten trim before. They’re in the lumber section and are linked in the supplies below.
Thank you!!!!