As most DIYers and crafters can attest, the feeling of accomplishment when you finish a project is completely addicting and is the best feeling in the world. Now add a really cute baby playing with that project… that feeling just got 39374 times better. I have seen baby “busy boards” around the web and Pinterest for years and have always known I wanted to make our future child one of them, so when little Connor started crawling(!) to all the hinges and knobs around the house I figured it was time.
Since I try really hard to find a balance between baby toys and gear being fun while not looking hideous and out of place in our home (what spurred this post), I wanted to make his busy board with all black fixtures, rustic paint, and natural wood. Our item for this month’s Monthly DIY Challenge was wooden beads, the perfect addition to a busy board!
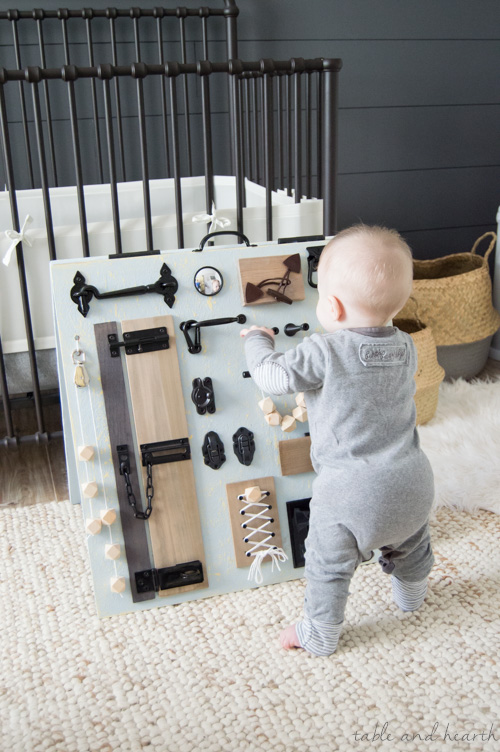
How to Make a Stylish and Rustic Baby Busy Board
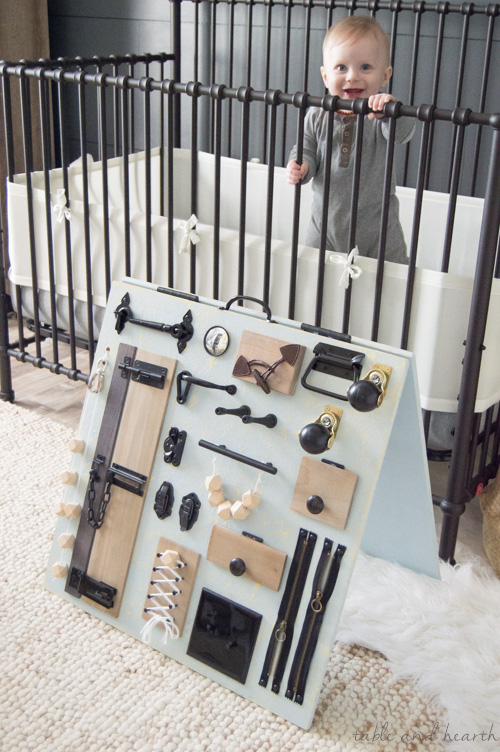
This sandwich-board style creates more of an activity station that works for sitters and standers and also folds down for storage too. If you want though, you can add stuff to both sides for double the fun stations.
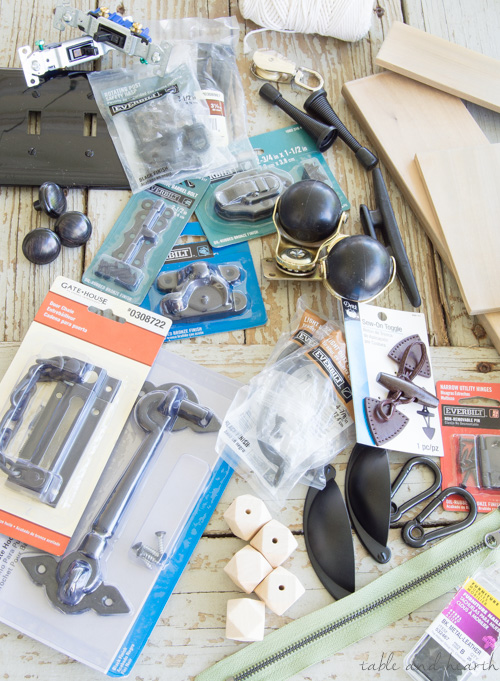
Supplies
These things are super fun to make since you can give it any sort of look you want; paint, finish, and what you choose to put on it. I loved just cruising through our store thinking of things that could work on it. Also, who knew there were a bajillion different latch types?!

 *affiliate links have been used for your convenience. Click here to see my full disclosure policy
Once you have the boards and paint for your piece, the rest of the supply list is pretty much just going hog wild in your scrap wood pile, junk drawer, then local hardware and craft stores and grabbing any and everything that a little one can safely fidget with. Hardware aisle, electrical aisle, plumbing aisle, even the automotive aisle, and then various sewing notions at the craft store.
- (2) pieces of high-quality plywood in your size preference – mine are 2’x2′ and 1/2″ thick, although I suggest 3/4″ plywood (see notes below)
- paint (and Saltwash for a finish like mine)
- painting supplies
- palm sander
- drill – you’ll definitely want to pre-drill your screw holes for the pieces!
- heavy duty adhesive gel (if needed)
- (2) door hinges
- cabinet pull for handle
- scraps of wood – this trim works well, I stained mine with Weatherwood Stains
- electrical switches
- wooden beads
- miscellaneous latches and hinges – some links at the end of the post
- small mirror
- small pulley
- yarn
- zippers
- toggles
- caster wheels
- doorstops
- knobs and pulls
- furniture tacks
- whatever else you want to put on it!!
- one cute baby
I went for an all-black design for my board pieces and if you go the same route, I will warn that there are less items that come in that finish than in other finishes (which is weird, because black/oil-rubbed bronze is a very popular finish right now) AND if you need black screws for your pieces they’re also very few and far between.
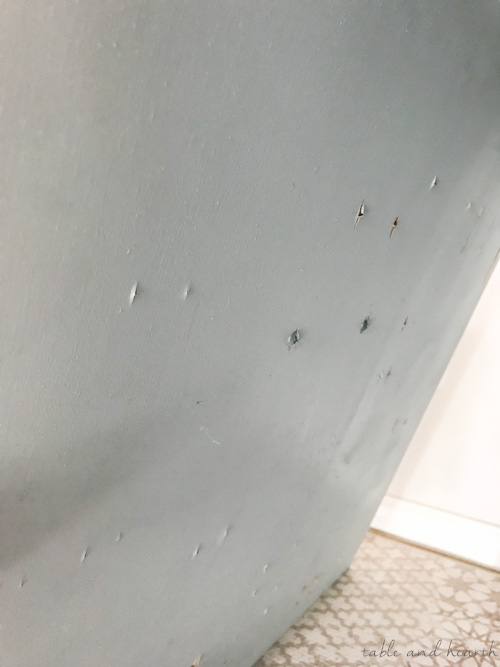
As for the plywood thickness, I suggest getting pieces that are thick enough where you don’t have to worry about the length of the various screws. I used 1/2″ thick boards but really needed 3/4″ to avoid the issue in the next photo. I tried to find shorter screws to keep it from happening but like I said, there’s not much of a size selection for black screws. I ended up putting hot glue over these to keep little fingers from getting poked someday.
Lastly, I originally planned to find some sort of collapsible locking arms or brackets to lock the boards open for safety reasons but I couldn’t find anything that worked. But the piece is super heavy and actually very secure when opened so it turned out not to be as much of an issue as I thought it would. I put clear grippy dots on the four corners so it wouldn’t slide and they work great.
Instructions
After sanding your boards, you’ll paint them and use whatever finish you’d like. I went with Saltwash again (see process here) so that the boards would have a sensory texture effect also. Two little sample pots of paint were the perfect amount for my two boards.

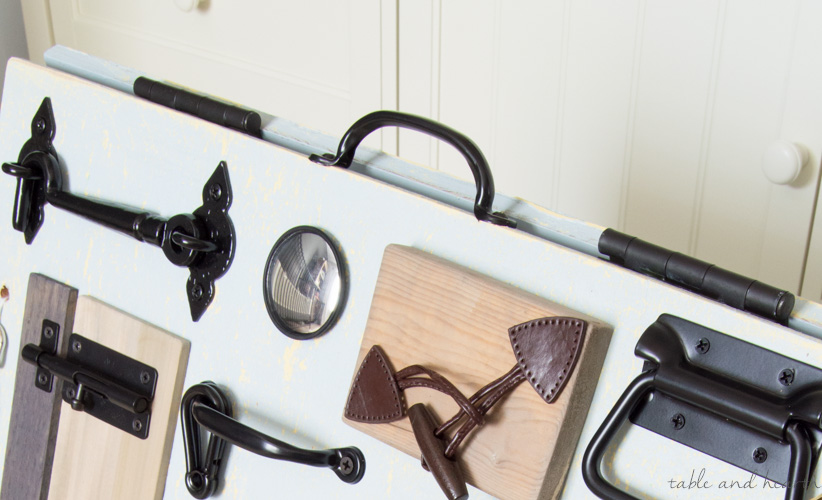
I don’t have pics for putting this together unfortunately because I had to do it in the evenings but luckily it’s pretty straightforward, just attach two standard door hinges to the boards and put a handle in one of the top edges. It is easier to do this part before putting all the stuff on the boards, trust me :) Then just lay out your pieces and start installing them! Use the heavy duty adhesive gel in places where screws won’t work like the little wooden doors. I used a jigsaw to cut the hole out for the electrical switches.
It folds flat(ish) for storage too which is nice since our spaces aren’t that big and the handle makes it much easier to carry around.

You guys, he LOVES this thing!!! We put it down and he hustle-crawled his way over to it and went to town, immediately going for the doorstops then yelling at himself in the mirror. I probably could have just made a board full of those two things and he’d be good to go. He’s still a little too young for some of the latches so this should last him for a while, plus I’ll probably add on to it when I find other things that would be fun.
While this isn’t technically the first project I’ve done for him, it was definitely more well-received than the changing pad tray or closet crates, ha!


I see many more fun projects for this guy in the future given at how well-received this was…now if he’ll just give me some longer naptimes in order to do them!
See what the other girls made with their wooden beads by clicking the images below:


project panel

hobby board

sander

drill

miter saw

jigsaw

Saltwash

Weatherwood stain

stubby brush

yarn

RapidFuse

wooden beads

sew-on toggle

ball casters

zippers

furniture tacks

double toggle wall plate

toggle switch

hinges

pull handle

gate latch

misc cabinet latches

misc door latches

pulley

spring door stop

cabinet knobs

small round mirror

bar pull

caribeaner


dresser

metal wall hooks

burlap cord cover

quote sign

octopus print

glass jar

metal caddy

cubby half bin

seagrass basket

seagrass basket

faux sheepskin rug

wall cubby

jute and wool rug

diaper pail

iron convertible crib

rustic tall bookcase


Hanging Closet Storage Crates

DIY Changing Pad Tray

How to Make a Driftwood Mobile


Share this!
What a fabulous idea, Emily! And little C looks awfully proud of it! Adorable!
This is so cute and these pics of Connor playing with it are too adorable! Love it and him!
I need to stick him in all my photos from now on I think :)
Thank you Kendra! It’s gotten us through a rough week of RSV and ear infection :)
Emily, I LOVE LOVE LOVE this!!! We’ve been wanting to make one for our boys. I love that you found a way to make it stylish!! So cute!
They would love one Nicole! He run-crawls over to it everyday :)
This is adorable! I wish we would’ve made one years ago! And I’m sorry to hear about the RSV– that one is tough. Thank you for sharing your project!
Thanks so much Brittany! Knock on wood I think we’re out of it now…for a while at least, ha!
I have started this project and I’m confused about how to get the light switches on. Are you cutting a hole to fit them into the board? Thanks!
Yes, I briefly mentioned it in the instructions but unfortunately didn’t have a picture of that step (which is probably good because my jigsaw skills definitely need some polishing), but I just traced out how big the cutout needed to be then drilled holes in the corners of the section to start the jigsaw in and cut it out.
Would love to know how you put the light switches on. Did you have to drill through the board?
I’ll have to go back and see if I did get a pic of that step and add that to the blurb where I talk about the switches, but yes, I used the jigsaw and a drill to cut out the opening for the switches. I traced how big it needed to be then drilled some holes in the corners to start the jigsaw in and just cut it out. Not the prettiest job but nobody will see it after the cover is on ;)
I love that you found a way to make it stylish. We have been thinking to make one for our boys. Thank you for sharing your project.
I knew it’d be out in our main living room so of course I wanted it to blend in with everything else :) He is still loving it too!
this is Beautiful! I am going to attempt to make one very similar for my son! Thanks for the tutorial.
Aw, thank you Donna! Hope he loves it as much as ours did :)
How much did this project cost?
I had all the wood and a few of the hardware pieces on hand already, but if you had to buy everything up front it’d probably run about $75 I’d say?