I’ve been so excited about this day y’all!! I’ve joined the awesome ladies of the Monthly DIY Challenge this year and every second Wednesday of the month will be sharing a DIY project centered around our chosen topic. These are some of my blogging besties (like serious besties, we talk all day everyday…) and some of the most creative people I know, I have no idea why they let me in this pack ;)

This month’s theme was metallic paint and I was fah-reak-ing out over what to do up until like a week ago. I almost thought I’d have to bow out of my very first month like a lame-o. Then, as a true Fixer Upper fanatic, I remembered one of my favorite items from our pilgrimage to the Magnolia Market Silos grand opening, and one of Joanna’s favorite items, the Dutch tulip crate, and a light bulb went off…I’ll DIY my own and use metallic bronze paint on the metal bottom! Any reason to get some wood out of the scrap wood pile :)
I was really surprised how easy this ended up being for coming out looking pretty spot-on to the original. A little more weathering would make it even closer, but it scared me enough to stencil this little bit (#graphicsphobe).

DIY Dutch Tulip Crate Supplies

Like I mentioned, this project is awesome for what you may have on hand, all I had to buy was the metal (ignore the handles, I decided not to use them). The dimensions below are just suggestions, you can alter the measurements for whatever scrap wood you have on hand.
- 1″x3″x48″ board – cut into two 24″ pieces
- 1″x3″x24″ board – cut into two 12″ pieces
- 3 wooden stakes/lathes – cut into 12″ pieces
- 1″x1″x36″ square dowel – cut into four 6″ pieces
- 2’x4′ sheet of perforated aluminum
- wood stain and staining supplies
- metallic spray paint (I used my fave)
- sander
- nail gun
- staple gun
- wood glue
- permanent marker
- metal snips
- letter stencils
- stencil sponge or small brush
- paint (I used chalk paint)
- gloves and safety glasses
How to Make a DIY Dutch Tulip Crate
After sanding and cleaning all your wood (I left the wood pretty rough so it’d look distressed), make your frame by nailing a couple of brad nails into each end. You could also use a pneumatic stapler if you have it.

Lay your metal over the frame (use gloves!!) and mark where to cut it. Then carefully cut it using the metal snips.
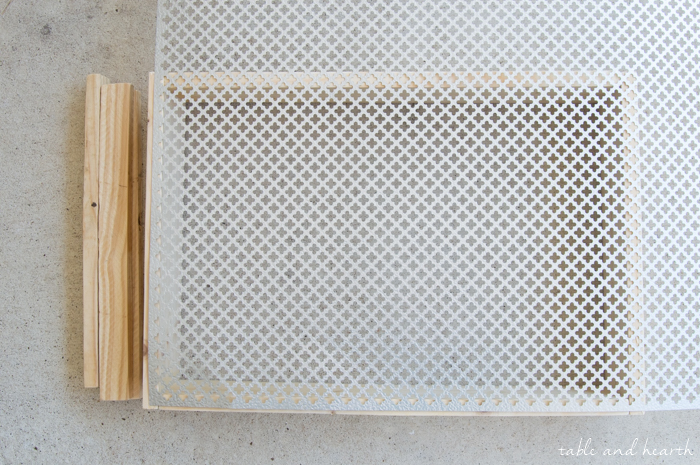

After cutting your piece, give it a couple coats of the spraypaint and let it dry.

Stain your frame and the other wood pieces. I used a 50:50 mixture of Classic Gray and Dark Walnut to give it a slightly aged and weathered finish.

Once the stain and metal was dry I used my stapler to attach the metal to the underside of the frame, then nailed the three slats across the bottom. I was concerned about the raw metal edge on one of the sides underneath but it actually didn’t come out very rough at all with the snips. And, since the three slats will keep it up off any surface a little it won’t be a big deal. You could always add a thin piece of wood across those edges to cover them up though.


Glue the 1″x1″ pieces into each corner and clamp until they’re good and dry.

You can leave your tray bare, or you can try and mimic the old labeling found on old crates like the inspiration piece. Stenciling still scares me because I can NEVER get it even and I’m way too lazy to measure lines out, but I decided to go for it on this piece. I thought about coming up with something cheeky but the foreign words just look so much better on these, so I Googled how to say “E&M floral supply” in French. Well, when I showed my Canadian friend Erin at DIY Passion my lovely translation work, she kindly informed me that that’s not really how it would be said… whoops!!! Apparently this Texas girl needs to stick to English for the time being :)

For a last minute freak-out project idea, this may be one of my favorite little projects to date! One, because of how close it came out to the inspiration…Two, because I hardly had to buy anything to make it…and Three, because it’s a versatile piece that we’ll be able to use all around the house.


nail gun

wood stain

perforated metal

sander

staple gun

letter stencils

metal snips

metallic spraypaint

wood glue

Rustic Patio Makeover

How to DIY Shiplap

Light and Bright Master Bedroom


linking up here: I Heart Nap Time
This turned out so good! The stain is gorgeous and the perfect distressed color. I definitely need to add this project to my ” To Do” list!
It was so easy to do too Katie! Go for it :)
I love your ‘floral offering’ tulip tray! ;) It’s gorgeous and you are seriously a master of all things DIY and channeled Jojo to perfection!
Ha! Thank you Erica :) I guess I always could have picked something that translated worse!
This is SO awesome! One of my favorite T&H posts to date! Great work and welcome to the challenge!
Aw, thanks so much Bre!!! I’m honored to be amongst you ladies :)
hey girl- this is so cool!
Thank you Shawnna!
This looks great! I particularly like the aluminium sheeting you used – the pattern is lovely, although I’m not sure if I could find that here in the Nederlands. I guess the alternative for me is scouring the street markets in the summer for an old one to do up.
Thanks Sam! Our stores here had a few patterns, this one was by far my favorite. Although I’ve seen these done with basic chicken wire or wire mesh too, and I think it’d be super cute with an old ceiling tin or something like that. Wishing you luck, and I’d love to see it if you found something :)
Emily…I love what you did with a few scraps of wood and some wire mesh! Absolutely brilliant. I just put it in my taliwind queue because I am pretty certain I’m going to want to completely copy your idea in a few weeks. Not only does it look good in your kitchen, but perfect on your back porch too…which is where I think I’ll need to have one.
Thanks again for sharing your creative brilliance.
Oh my gosh, go for it Lynn it’s so easy to make! I had the hardest time deciding where to photograph it, it looked good in literally every room of our home :) Please send a pic of yours when it’s done!!
I absolutely love this! I like your finish even better than the MM original. So glad you’ve joined our group, Emily!
Aw man, you are too sweet Amy!! Thank you girls so much for having me…this is going to be fun!!
What a beautiful project! I had never seen a dutch tulip crate, applause for the wonderful idea to reinvent the cuteness!
Thank you Michelle!! I was so surprised at how quick and easy it was to do, we love it!
This tray would be perfect for our front porch this spring! Thank you so much for the awesome tutorial and inspiration. Pinning!
Thanks Ashley!!! Can’t wait to see it in one of your beautiful spaces :)
Love it! Thanks for sharing the tutorial.
You’re very welcome Debbie! Hope it inspires you :)
Wow, your tray looks amazing! I especially love the look of the metal bottom, and it also helps make the tray lighter.
Thanks so much Vineta! The metal ended up being alot more sturdy than I anticipated too so that was an added bonus :)
Hi Emily, Nice job! I recently was inspired by the other “Fixer Upper”
Wooden crate like tray with the handles, which is discontinued on their site.
I used the wood I had, so it’s my own version. No matter, I love it. I’m a copycat and make PB inspired pieces as well. I’ll have to create the tulip tray.
Awesome Sue! It’s such a good feeling when you can recreate something you see somewhere yourself :)