I hope everyone had a good Easter weekend!
We spent ours completing the first step of Project Pergola: setting the posts. See our design plan here.
Husband initially wanted to build the whole thing this weekend but we quickly realized that was wayyyy too ambitious with everything else going on (posts would have to be set last Wednesday evening) and we should cool our jets a little. So we decided on just setting the posts and doing the top another weekend. Thank goodness we did cause post-setting sure wasn’t a walk in the park…
We planned on a footprint of 8’x8′ with 10′ 4″x4″ posts so that we could concrete 2′ of them and have about 7.5′ of clearance. On Thursday, husband picked up the posts and four bags of Quickrete as well as some supplies like a new post hole digger, levels, and clamps (a full source list can be found here in the reveal post). On Saturday, our crew assembled…the crew being the husband, the father-in-law, and myself. So really, the husband and his dad were the crew and I was the foreman, which meant I worked on sanding my wainscoting pieces and they had me check it all every hour or so ;)
*affiliate links included for your convenience, click here for my full disclosure policy
First step was to saw down the old “pergola”, a moment I have been waiting for for about four years.


Since the posts to the old pergola were concreted about 3′ down, they couldn’t be removed so the new posts had to go in the grass adjacent to the pad and off the two left corners. Unfortunately, a couple of years ago when we put the pond in we didn’t ever figure we’d be doing this, so the pond is really close to the pad but luckily the 4×4 would fit just so.

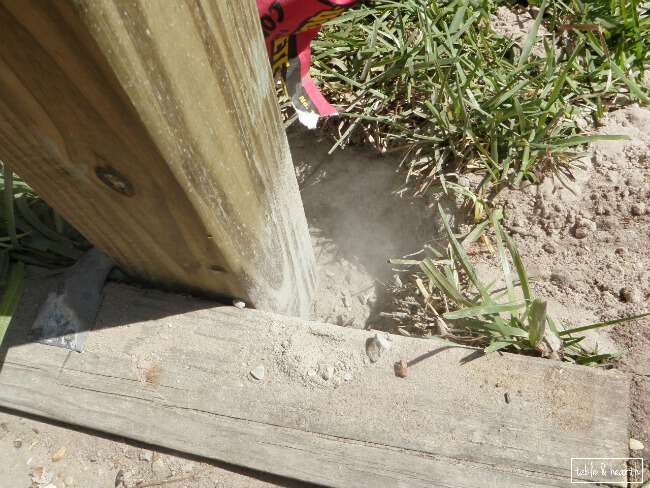
But, cue curveball #1 (we never dared to think this would be curveball-free): Yes, that is an electrical conduit line you see in the hole. It leads to that outlet on the back of the pad (on the left edge of this pic) which used to run the hot tub that was here on the pad.

It was about 12″ down and right in the middle of our planned post. Yes, we forgot to call 811 to have lines mapped out, and yes, the pond went just above it so we didn’t discover it during that project. So we shifted the post to be as close to the corner that we could get which just cleared the conduit. We had wanted these to be at least 2′ buried but this one was going to just have to be about a foot.

Continuing on, they started digging the next post hole. Which brought on curveball #2, the discovery of the concrete from the old posts. Of course, the concrete extends out a few inches at the base of all the old posts, starting at about a foot down, which means our post for the other corner could also only be buried a foot down.

Since we planned on it being 8×8′ (the size of the old one) this happened with the inner two posts as well but since they weren’t on the corner, their exact location could be shifted, so instead of 8′, we moved it to 9′ and it cleared the concrete,


After measuring various distances to each, tweaking, measuring, level checking, tweaking, measuring, level checking, measuring, and level checking again, they attached some of the brackets off the old posts to hold them temporarily for concreting. There were various frames and bracing contraptions tested but this was the easiest, most stable option, and didn’t involve cross braces falling on me, so I supported it. And after a beer break, it was time to concrete.
Since the back two posts are only concreted one foot, they are higher than the other two but will be cut even when we do the top. We may trim them all down to 7′ instead of having them at 8′ but we’ll have to see how it looks when we hold the cross beams up. On Sunday, we attached two galvanized 90 degree brackets to each post to further reinforce them, especially the back two.
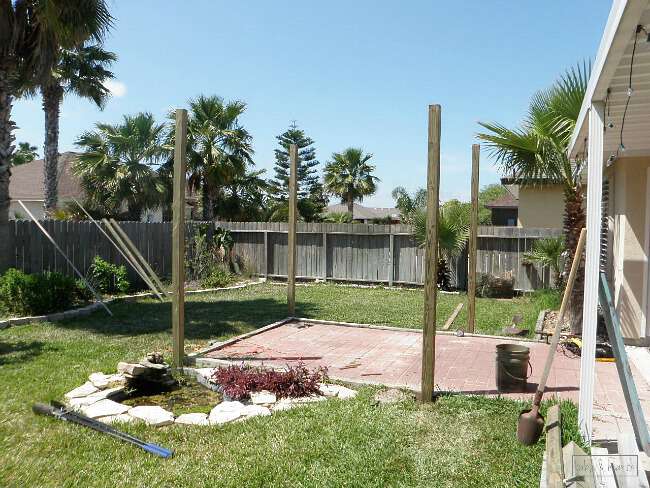
Even though it’s just the posts now, I can already picture the whole thing so much more and just getting rid of that stupid old structure makes it look so much nicer back here. My “crew” kicked butt and I am so proud of them! Along with the two curveballs, there were alot of measurements and numbers being thrown around all day so I’m more than happy I didn’t have to be involved with all that jazz. They may do the top this weekend or the next, depending on how the fishing outlook is of course….
And, today is my birthday (yay! on a Monday! <insertsmirkfacehere>), which husband completely spoiled me for with a new Nikon D3200 DSLR camera kit, and I spoiled myself with this nail gun for the wainscoting. Now to figure out how to work ’em!
UPDATE: The pergola is done, see the reveal HERE!


DIY Pergola – Part 1 – Planning

DIY Pergola

Fall Backyard & Pergola Staining


I admire you for tackling this! It always seems like there are unforseen obstacles with DIY home projects, but it will be exciting to see the results of your hard work. Happy Birthday :)
Thank you Nicki!! Ugh, yes! It was sure looking dire after this first day but luckily the second day went much smoother and it all came out so gorgeous! Check it out here :)