Happy MDC day! In what may be the most boring item we’ve ever picked, this month we are sharing projects using plain white pillowcases. To counteract the basic-ness of our item, I am sharing an easy tutorial to one of my favorite fine art methods which I’ve played around with for a few years now, that may or may not involve dead sea critters…

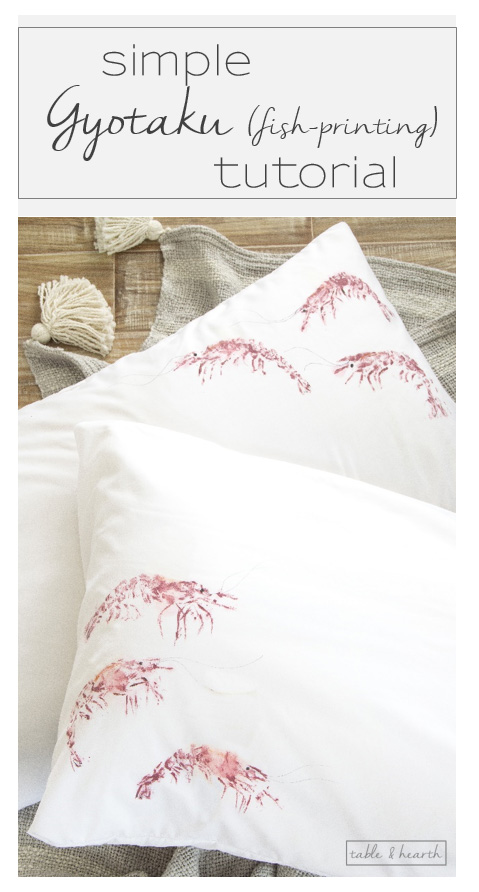
“Gyotaku” means “fish rubbing” and is an ancient Japanese art. Specimens are coated in paint then applied to fabric or paper to make a print of the specimen. Of course my style is very much amateur but it is still really cool to play around with and still comes out looking great to me. See some true Gyotaku examples here and here (an amazing local artist). I prefer to print on light fabrics instead of paper which makes it perfect for this month’s challenge item.
Easy Shrimp Gyotaku Tutorial
Supplies
Traditional gyotaku often involves printing various fish species which I love to use, but I also really love to print shrimp too and we tend to have them on hand whole more often than fish, especially whole head-on shrimp that Matt gets for fishing bait. Or when I forget to cook them in time and they end up in the freezer for bait, as is the case with these guys :)
I used white pillowcases for these since that was our challenge item this month, but you can use any sort of smooth fabric like muslin or a knit too. I didn’t notice until after but the pillowcases I grabbed were microfiber which the paint didn’t stick to quite as well as when I’ve used muslin or plain cotton before, so I’d suggest that instead.

- pillowcases (or other thin, smooth fabric) – washed and dried already
- head-on shrimp at room temperature
- acrylic paint or fabric paint
- fabric medium (if using acrylic paint)
- craft paintbrushes
- paint well tray
- Sharpie
- cardboard
- wax paper or newspaper
- paper towels
- practice fabric scraps (optional)
Instructions
I mixed various shades of the acrylic paint to get the “shrimpy” color I needed, plus some black, brown, and orange for accents to add later. Once the colors were mixed I added my fabric medium (according to ratios on its directions) and made sure it was mixed well.

Select a specimen and set it on the wax paper or newspaper to prep for painting. Use the paper towels to dry the shrimp off as much as possible so that the paint adheres easily. Paint the shrimp with your shrimp color on all surfaces of one side, head, legs, spines, tail, everything. You want a good coating of paint but not globbed on, you want to make sure the shell features will still show through. But don’t fret too much at this stage, you can always touch up the paint on the fabric after it’s printed.

If you are printing on fabric that’s one layer of two (like pillowcases), insert a piece of cardboard in between the layers before you print so that the paint doesn’t run through to the back.
Carefully lift your painted shrimp up by the head and tail and place it paint side down onto your fabric in the position you want. Lightly press it down, making sure to get all the little legs, spines, and tail in contact with the fabric. I suggest doing a few prints on some test fabric just to see how the paint is adhering and what parts of your shrimp will need some touch up afterwards.
*Note: You can also leave your shrimp where it is after you paint it then carefully lay your fabric over the shrimp instead then remove it. I’ve done it both ways and while laying it over the specimen does make a more thorough print, I found that I usually somehow get my fabric dirty or in a paint splotch or something more often that way. Definitely try it both ways and see which you prefer. I think the lay-over method is better for larger specimens like fish.

Yes, there may be some funky fluids and things that come out of your shrimp since you’re using head-on, but don’t worry, these get washed before any use and it will come out then!

Using a small craft brush, go back and fill in any areas of your print that you feel needs it like the legs, tail, and head (freehand if needed).

Here is also where you can introduce other colors to your prints to bring them to life. I added black for the eye, a little bit of black at the tip of the tail and legs, and some touches of orange on the backs.

Using a fine permanent marker, freehand the antennae on each one, and remember that they’re usually really long so have fun with them :)

Keep printing however many you want wherever you want them on your fabric then allow them to fully dry. Once dry, remove the cardboard if needed and wash your fabric according to the directions on the fabric medium.
While this little craft is more on the artsy side, it is extremely relaxing to me and I always love how it comes out! I think it’s just such a cool look, especially when you get into doing larger fish and other critters (like crabs!). It’s also a great way to make a “trophy” of a great catch, rather than getting it taxidermied. Some really talented gyotaku artists will print billfish, tarpon, dorado and other amazing catches!


I know this is a pretty non-traditional (and maybe icky) little project, but if you’re a nature lover like me and don’t mind working with some little dead critters, the end results can be really amazing and beautiful pieces for your home!
Have you ever tried this method of printing something?


fabric medium

acrylic paint

craft brushes

pillowcases

permanent marker

paint well tray


Shell Wall Hanging

Driftwood and Acorn Garland

Beach Collection Shadowbox


Share this!
This is such a neat idea Emily!!! I never would have thought to try this, but I love how it turned out!
Thank you Kristi!! It’s definitely an odd process at first but I love how old it is and the look it makes :)
This is such a cool project, Emily! I’ve never heard of Gyotaku, and I think this is such a unique way to create art.
Thank you Amy!
This is the coolest thing! I love how you took an ancient art form and made it fresh and modern! It is so perfect for your coastal style.
Sometimes you gotta work with some funky sea treasures to get some cool coastal decor ;)
I remember doing fish printing in preschool and it was so cool to see all the scales and details in paint! What a fun, interesting, and historical technique. Your pillowcases turned out great!!
Do you live by the ocean. It is my favorite place. I started collecting items that were coastal theme before they ever had things up north that were coastal. I decorate my living room, dining room, with fish, shells etc. My master bedroom I use palm leaf theme. I have a guest room and it is shells/fish them. I love them but I just can’t do any more crafts of buy any more stuff because I have enough. I also do one Christmas theme coastal. Now tell you how much I love it. Check out my Christmas theme. https://www.pinterest.com/kidosmom/my-christmas-theme-ocean/ Scroll down and you will see how I decorated. I love your idea and think you have a great touch as a crafter.
Hi!
Feel a little silly that I have missed your blog earlier – just discovered today when I was doing some research for our company. Love this idea of creating art projects from actual sea creatures!
Have just started following you on Pinterest too. Am fascinated by your “biologist” by day and diy’r by night bio. Nice to meet you! – Caron
Hi Caron, so happy you are here!! It’s an odd combo but I love it :)