Squeee!! I’m so happy to finally be showing you guys this project! I had everything ready to go for it back before the holidays but it just kept getting interrupted and took for.ev.er to finish. But it was sooo worth it!
We had a simple World Market bookcase in here for the last few years but we needed a little more space, a little more style, and a little less sagging shelf action.
Its no secret I love the industrial-meets-rustic look so all of the industrial pipe shelving projects floating around Pinterest and blogland lately (like this, this, and this) had me instantly. I’ve been wanting to do one somewhere for a while and this was the perfect spot. So I sketched up a plan and came up with what pieces I’d need.
I loved the asymmetry of having a skinnier shelf instead of all one size so my plan had four 4′ boards and one 2′ board located on the left side, giving me a larger opening on the right.
*affiliate links included for your convenience, see my full disclosure policy here
DIY Industrial Shelves Supplies
*all pipe is 1/2″ diameter pipe
(1) 1″ x 12″ x 24″ poplar board
(3) 1″ x 12″ x 48″ poplar board
(6) floor flanges
(14) tees
(17) elbows
various pipe lengths:
(1) 25″ piece (30″)
(3) 20″ pieces (24″)
(6) 16″ pieces (24″)
(2) 14″ pieces (24″)
(6) 18″ pieces
various connector lengths:
(2) 10″
(3) 8″
(14) 6″
(3) 4″
(2) 5/16″ anchors w/ screws 6pk.
1″ hole saw with arbor
staining supplies
Some of the nipples and pipe lengths come ready to go in certain sizes, others (like the 25″, 20″, and 16″) need to be cut and threaded by an associate at the store which, for me, took forever every single time I had to do it. Only a few of the employees are trained on the machine and it always took a while to track them down. So if you can, try to make yours using the stock dimensions and if you need to get some cut, allow yourself plenty of browsing time. I tried as much as I could to keep mine stock but still had to have some cut. There was the sweetest guy at Home Depot for one of the trips so it made it go by faster :) Also, many stores didn’t have the quantities I needed in one trip so I had to keep going back. I HIGHLY suggest ordering the fittings online so you can go get them in one trip!
Also, this stuff comes with a grease coating so you’ll want to wash your pieces off with warm soapy water or Fast Orange beforehand (and dry them, they’ll rust quick!). The longer pieces come with a super gross layer of black sticky crap on them which is a b*tch to get off. I tried Goo Gone and a scraper first but found that Fast Orange worked the best.
I went ahead and assembled what I could until the boards were ready so that installation would be quicker. When screwing these pieces together, you only want them hand tight. Don’t wrench down on them because you won’t be able to undo them and you’ll need to tweak some of them while you’re assembling.
I initially wanted to use thicker and wider boards but these poplar boards were already the right widths so for efficiency purposes, I used them. To make up for how shallow they are, I exchanged the 8″ nipples for 10″ nipples on the top horizontal flange arms to have it stick out away from the wall a little further. So the supply picture above was modified slightly. There are a ton of plans out there so finagle the dimensions of all of it to your space, just be aware you may have to modify as you go like I did.
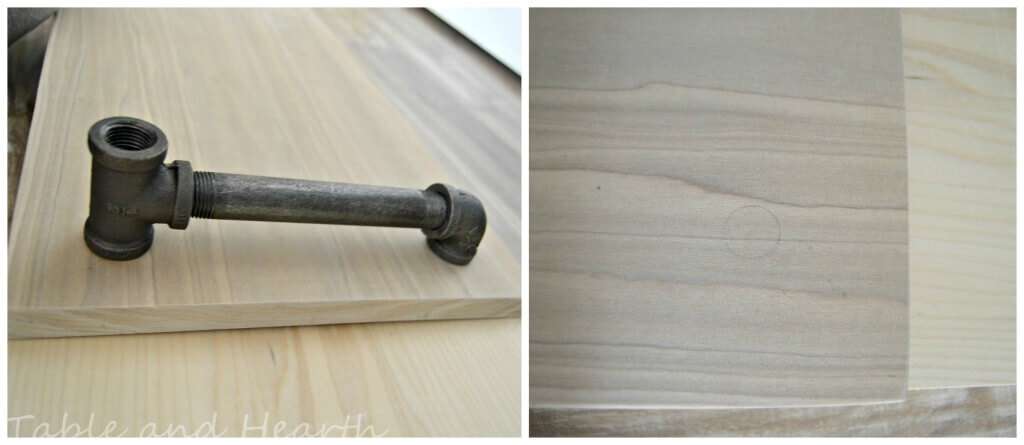
To get the shelves ready, I marked where I wanted my front holes to go on the first board (I think it was 1.5″ in each way).
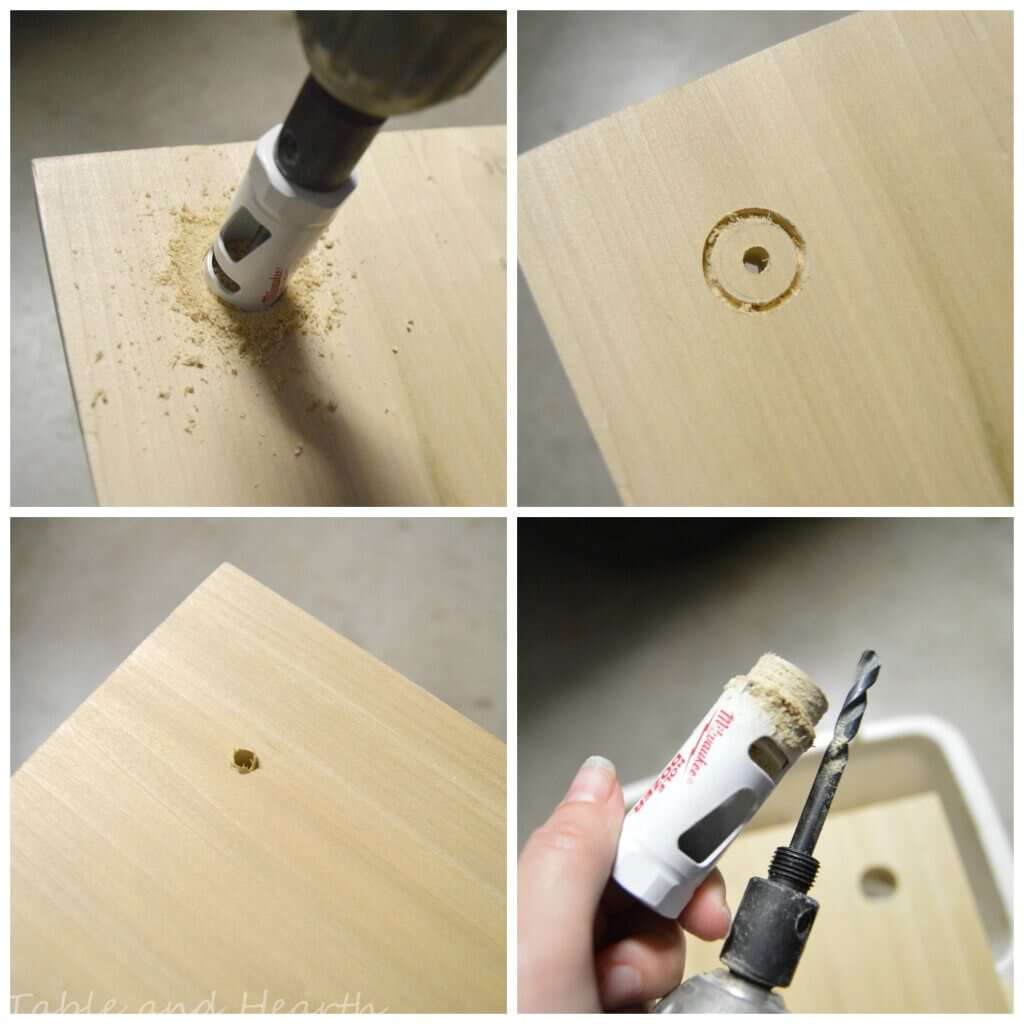
I’ve never used a hole saw before so I had to a) learn what one even was, b) figure out how it’s supposed to go on my drill. First, you need something called an arbor which is a drill bit with a male threaded base to it. Then you get the separate hole saw in whatever size you need and screw it onto your arbor. The drill bit of the arbor makes a pilot hole so that the hole saw starts easily. This is pretty much my favorite thing in our tool box now, I want to drill holes in everything with it. Hole saw all the things!
Anyway, to keep the backside of the hole from splintering, I drilled about halfway through one side then flipped the board and resumed drilling from the other. Oh, and there are one-piece hole saws (arbor+saw), which I tried first, but the bit broke on the very first hole. It was impossible to make a clean hole with just the hole saw part, apparently the pilot bit part is essential. So I went back and got the two piece assembly you see here and it worked like a charm. Just a heads up :)
Once I had the holes done for the skinny shelf, I just laid it over the first long board, traced those holes, then measured for the third hole. Once I had the first long board with it’s holes, I did the same for the other three; stack, trace, drill. The less measuring the better.
Then on to staining. I tested three different methods on a scrap first; only stain (right), PolyShades (middle), and stain then clear poly (left). I chose to go with the stain and clear poly. The PolyShades was darker than I wanted.
You can see my splintery-non-pilot-bit-hole-drilling attempt on this piece :)
Finally everything was ready to go but, as usual, once I started assembling, I could see that my five-shelf plan wouldn’t leave enough room at the top as I had thought (me+math=nada) so I left the top shelf and one set of the 16″ arms off.
Here is a rough cost breakdown for this project, as I had planned it with the five shelves total in all 1/2″ pipe. I gradually purchased the supplies, using gift cards from my credit card points along the way :)
(1) 1″ x 12″ x 24″ poplar board – $11.45
(3) 1 x 12″ x 48″ poplar boards – $21.58 each – $64.74
(6) floor flanges – $39.66
(14) tees – $1.97 each – $27.58
(17) elbows – $1.54 each – $26.18
(1) 25″ piece (30″ piece) – $7.62
(3) 20″ pieces (24″ pieces) – $19.29
(6) 16″ pieces (24″ pieces) – $38.58
(2) 14″ pieces (24″ pieces) – $12.86
(6) 18″ pieces – $28.68
(2) 10″ nipples – $6.86
(3) 8″ nipples – $8.79
(14) 6″ nipples – $28.98
(3) 4″ nipples – $4.59
(2) 5/16″ anchors w/ screws 6pk. – $6.00
1″ hole saw with arbor – $9.79
staining supplies – already had (~$10 if not)
TOTAL —>>> approximately $350
I don’t have any pictures of assembly since it took two of us. It gets built from the ground up and is only secured at the top so it was a little sketchy for a while. We had to tweak some heights by unscrewing/tightening to get everything level but it wasn’t too bad, the arguments were at a minimum. A few screws at the top and tada! All done!
Still with me through all that? Good, you’re on the downslope now :)
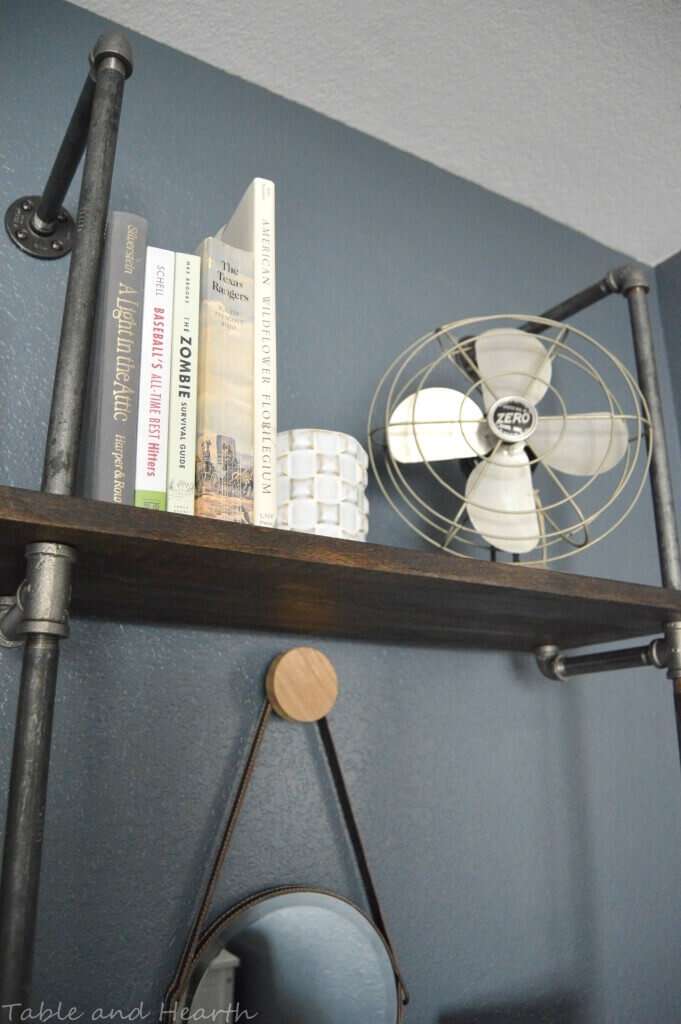
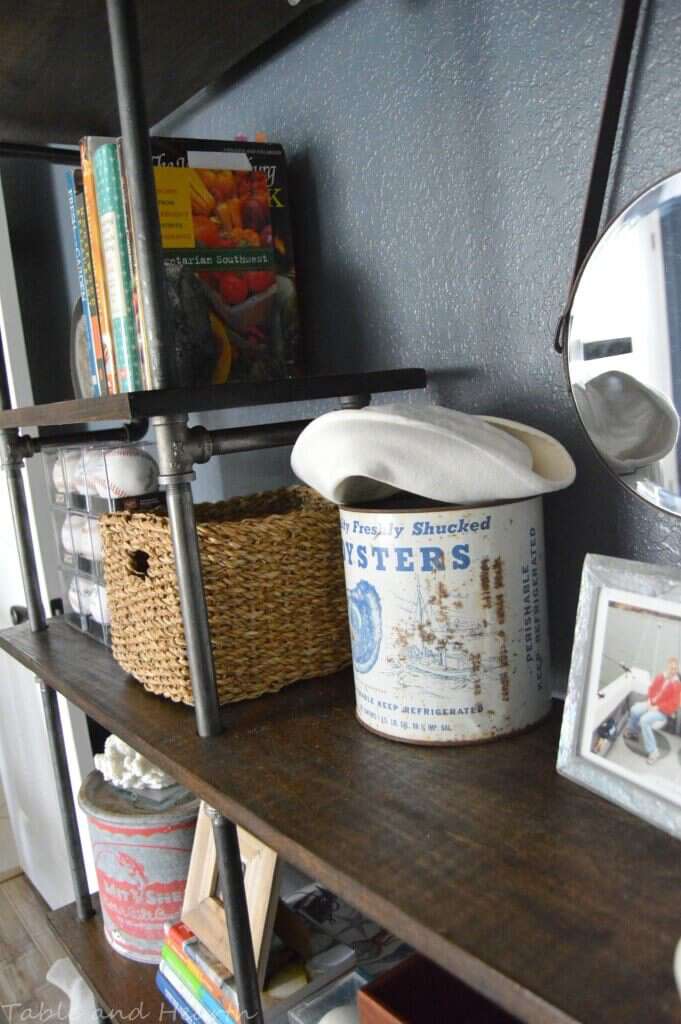
The plan was for this to be the husband’s baseball memorabilia display but all he wanted to put up were our autographed baseballs. I’m sure a few more items will find their way here in the future though ;) The rest is just books, storage, thrifty things, pictures, a mirror, and one of my Dad’s Navy hats. These shelves will be rearranged no less than a dozen times in the next month or two though, I can promise that.
And for the obligatory barrage of pictures since for once I finally got decent light in this room!
I just love them!!! There is so much more room to display stuff, so much more space for storage, and it makes the room feel alot bigger since there’s not a big piece of furniture there anymore. Our ugly duckling office is just getting better and better, especially if we can figure out some way to tame the stupid little desk area. Next project, however, we are back in the guest room hopefully making a big impact with something else I’ve been dying to do forever…stay tuned!










You did an awesome job! It looks beautiful! Great tutorial too! Thanks so much for the link back to ours too! xo
Hi Roeshel!! Yours was my main inspiration and oh my gosh your post was such a HUGE help in figuring it all out so thank you :)
This looks awesome! and you styled in beautifully.
Deb
@Seeking Lavender Lane
That is a huge compliment Deb because I was so worried about styling! Things got put on and taken off and put back on like a dozen times. I’m really trying to step up my styling game so thank you :)
Looks amazing! Seriously! I totally want to try this in my living room (with the help of the hubby, of course).
http://www.lee-lee-land.com
Go for it Elyse! It was pretty simple except for the assembly part, which was really just more cumbersome than hard. And having to tweak when your math sucks like mine :)
Emily, I LOVE how that turned out! I also love your vignettes. So cute. Great tutorial! I am pinning this.
Thanks Leia!! I tried really hard on them :)
This is awesome! I have been incorporating some pipes and dark woods into my home, and am loving it. This looks amazing, the perfect blend of rustic, industrial and homey!
I am so addicted to that mix too! Thanks so much Emily :)
They look so beautiful, Emily!! Such great work and I love, love, love your pics! Enjoy.:)
Thank you Shannon! The light is always so horrible in this room but there is a window from about 10-11am when the sun comes in and it’s better so I was scrambling to get it all cleaned up and staged by then on Sunday #bloggerproblems
Emily, this is fabulous!!! I love it and how you tied it all together with the accessories too :)
Thank you Naomi!! Industrial meets rustic meets nautical meets…baseball?? :)
I love it so much, Emily! So much better than the bookcase. I absolutely love the industrial look. You guys did a phenomenal job!
Aw thank you Sarah :) We love it!
AHH ohmygoodness I LOVE this! It turned out so amazing! Pipe and wood is such an excellent combo. I’ve been afraid to use most powertools since I have no idea what I’m doing but I might just have to try it for beautiful shelves like these!
I love me some power tools but the hole saw is super simple and fun to use. You’ll be making holes everywhere :) I’ve seen these done where the board doesn’t have holes though and it’s just attached to the arms with C brackets underneath so that’s an option too if you don’t want get the drill out.
Oh, I LOVE the new shelves! You can never go wrong with wood and pipes! You also styled them beautifully, great job!
It’s one of my favorite combos by far. Thanks Katie :)
LOVE this Emily!! Beautiful job! Makes me want to make one :)
I want to make like five more! Thanks Lindi :)
This shelf looks so good Emily!
Thank you Leigh Anne :)
Wow, Emily! That shelf looks awesome! I’m also loving those wood floors… and that cute daybed… and the lamp… okay, I love it all!
Aw, thank you Amy!! The daybed is from Ikea for about $400 and the lamp is from Urban Outfitters for only $160, both super reasonable! This room has come a looooonnnng way so it makes me super happy it’s finally love-able :)
These turned out SO great!! I loooove how you attached them to the wall at the top! I want some like this now. I don’t know where, but I don’t care. :)
That’s how it started for us too, I just had to have them somewhere! The bookcase was unsatisfactory for a while so bingo, up it went :)
Oh Emily! This makes me want to replace the traditional bookcase in my living room. Your industrial pipe shelf turned out beautifully.
Thanks Carrie! I love that it is so easy to customize them for whatever space you have and make as many shelves of whatever size you want.
That is a fantastic bookshelf!
Thank you Virginia!!
They look AMAZING Emily! Great job. I’ll miss hosting Found & Foraged…meeting you was one of the best things about it! I’ll be partying at Kyla’s with you though from now on. :) xoxo!!
Thank you friend! I was so bummed to hear you and Grace weren’t hosting anymore but yes, I’m soooo glad I found you guys through it!!!! You guys are amazing :)
Wow, Emily! Amazing job!! Love how you styled it too…. that fan, the mirror… and that daybed is beautiful! Hope you have a fabulous week! xo
Thank you Kendra! I’m so happy to have a cool space to display them finally :)
I love this, so my style…..you did a brilliant job!
Thanks Gilly!! I am such a sucker for anything rustic and industrial :)
What a cool thing to make! I don’t know why all this industrial stuff intimidates me, but this is a great tutorial to go off of.
Aside from staining the shelves, it took only an hour or so to put it together! So easy!
This turned out soooo good! Love it!
I just want to sit and stare at them all day ;) I want them everywhere!!
LOVE!!! This is amazing, Emily!!
Aw, thank you Amy :)
I love your shelves and I’ll be looking to see if I can source the parts locally for my own. I shared on tsu
Awesome Stella! Let me know how it goes for you and I’d love to see it if you make it :)
What awesome shelves! Love the look!
Hi Leslie, thank you!!
I love this!! You are my hostess pick of the week tomorrow – Thanks for sharing it with us at Work it Wednesday this week – hope to see you back again tomorrow!
~Krista from the happy housie
Oh my gosh Krista, thank you SO much!!! Work it Wednesday is by far one of my favorite parties :)
Wow, your post makes mine look feebel. More power to you!
Really love these they really have that rustic look! I might have to try making these, too! Thanks for sharing!
Go for it Robin!!
You did an amazing job! those shelves should last a long time….
Nancy
wildoakdesigns.blogspot.com
Thanks Nancy! Yes, they are super sturdy! Even though they’re only connected at the top, there’s 12 screws and anchors up there.
This is amazing!! I am loving the industrial look and so does my husband… which is like the first time we’ve ever agreed on home decor. I definitely want to try and build this. Thanks so much for sharing with us at Talented Tuesday. I hope you have a Happy Valentine’s Day and you can join us again next week.
I feel like the industrial-meets-rustic thing happening lately is a good compromise for alot of households ;) I’d love to see it if you make it!
LOVE these! Thanks for sharing at the Monday Funday party this week! :)
Such a great party! Thanks so much Meredith!!
This is amazing! Needing something like this for the office. It’s perfect. (And I love the wall color!) Thanks for sharing at Link Party Palooza!
They are so easy Ronda!! I love how the stained wood looks against that wall color (SW “Outerspace”).
Emily thanks for linking up to Bewitchin’ Projects Block Party!! I love love love this shelf unit. You did an amazing job. I really really want to make one myself now! I also wanted to let you know that I will be feating this over at the party this week! Have a great day!
-Shonee
http://www.hawthorneandmain.com
Yay!!! Thank you SO much Shonee!!! You definitely should make some!
Love this! Could you share an estimated dollar cost to produce this lovely bookcase?
Thanks in advance!
Mary
Hi Mary! Doh! I totally meant to scrounge up my receipts and put that in, so thank you for reminding me!! I updated the post with a cost breakdown along with supply links if I could find them. This project came to approximately $310 for me, although if you used reclaimed wood or wood you already have, it would save a good chunk of the cost. Hope this helps Mary, let me know if you have any other questions :)
Emily,
Thanks so much for sharing this neat looking piece at my party…GREAT STYLE!!! It will be featured at my party on Monday.
Blessings,
Linda
Thank you so so much Linda!!
Love this!! I may have missed it, but how long did this take you!? Now… I’m trying to figure out where it can go in my house ;) I’m loving all your latest creations! Keep up the good work ;) You’re inspiring me lots!
Awesome! Thanks Jamie :) It took me a while to gather all the (correct) supplies and stain/poly the boards, but once that’s done, it only took maybe a couple hours tops to install it!
Absolutely LOVE! Please come make one for me (haha). This is such a great decor statement – I adore it. Pinning!
Thanks for linking up to the Pretty Preppy Party! xx, b
Thanks so much!! And I’ll be right over ;)
Love it! I helped a friend make a set of pipe bookcases, but she wanted it free standing. It turned out to not be very structurally sound, so maybe attaching them to the wall at the top will hold them in place.
Thanks Vineta! Yes, they tend to be very wobbly unless they’re attached either at the wall or to a ceiling :/
Love! I too am infatuated with pipe and wood shelving, and am dying to make my own. Thanks for such a great tutorial, I will definitely use this ! Have an awesome day.
I still love it so much and would love to put more somewhere someday (although I probably need a new house for that!) Go for it, and I’d love to see it when you are done :)
Hi Emily,
This looks great! I am researching what I will need to build one of these for my husbands hundreds of books! I noticed you used more elbows than flanges, I have seen other designs where they used flanges to the wall under each shelf row. Is there a particular reason you chose to use elbows? I like both ways, but am curious if supports are different or something?
Hi Sarah! I wanted minimal holes in the wall so I chose to only put the flanges at the top to connect the unit to the wall and have elbows supporting the shelves. Since I knew there wouldn’t be too much weight on the shelves it works fine, however if there will be a lot of weight on yours, you may choose to have it attach at more locations using the flanges instead of elbows.