It takes a lot for me to put the effort in to try and DIY something I’ve seen in a store or have bought, I’m just not one for a knock-off in most cases. It’s either got to be CLEARLY easy to do myself, or it’s got to be way too expensive. This project is one of the formers, something that was so easy I was kicking myself for not figuring out a way to do it myself before.
The drum pendant light in the nursery had a really long cord which took three sections of this burlap cord cover to get all the way down. When my mom got a similar fixture for her place, she asked me about my cover and I got to thinking that there’s got to be an easy way to DIY it, which also meant we could make it as long as we needed and not have to buy multiple sections. One of our good blog friends Carrie from Kenarry: Ideas for the Home provided us with some of her big ‘ol rolls of burlap ribbon to use in this month’s challenge and it ended up being PERFECT for this!
 *this project was sponsored by Kenarry: Ideas for the Home and affiliate links have been used for your convenience. Thank you for supporting the brands that we love! Click here to see my full disclosure policy
I was really happy to see that it was a more open weave burlap as I feel like it has a more casual vibe that can work with more styles than the usual farmhouse/country burlap is known for.

How to Make a DIY Burlap Cord Cover
I love the open weave to this ribbon, but to be sure it’d be sturdy enough for snapping and unsnapping I went ahead and used two layers, so take that into consideration when you’re figuring out how much ribbon you’ll need.
Supplies

There’s just a few supplies needed for this project, the main key being some good quality snap pliers. Funky looking, yes, but simple to use.
- wide burlap ribbon – one large roll or two rolls so you can use two layers
- Kam snaps – I used black but they come in a TON of colors and even clear
- snap pliers
- tape measure
- scissors
- marker
Instructions
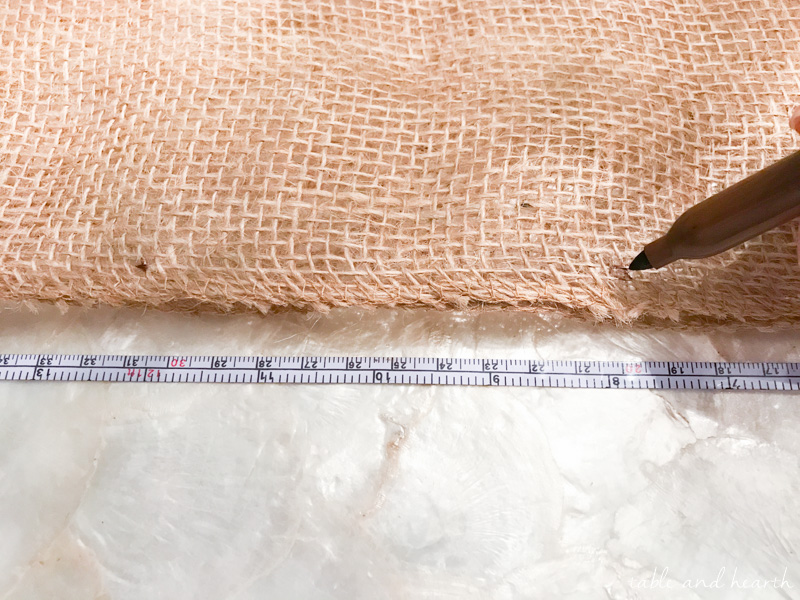
Since these cord covers are meant to have a scrunched look, they’ll need to be about twice as long as the section of cord is. I found it was easiest to have two rolls of ribbon laid on top of each other that I just rolled from as I went, but you can measure and cut two sections to use if needed.
The first step is to mark where your snaps will go. I decided to put my snaps four inches apart which kept the cord wrapped while not having to add a million snaps.
Until this project I had never seen or heard of snap pliers or had seen Kam snaps up close. Um, they are made of FOUR pieces EACH! And I had no idea what went where at first. It took a little playing around to figure out how they went and how the pliers worked, so if you are a snap newbie like me you’ll want to cut some extra ribbon to do some test snaps on so you get the hang of it, and then also to see how they’ll need to go onto the ribbon.

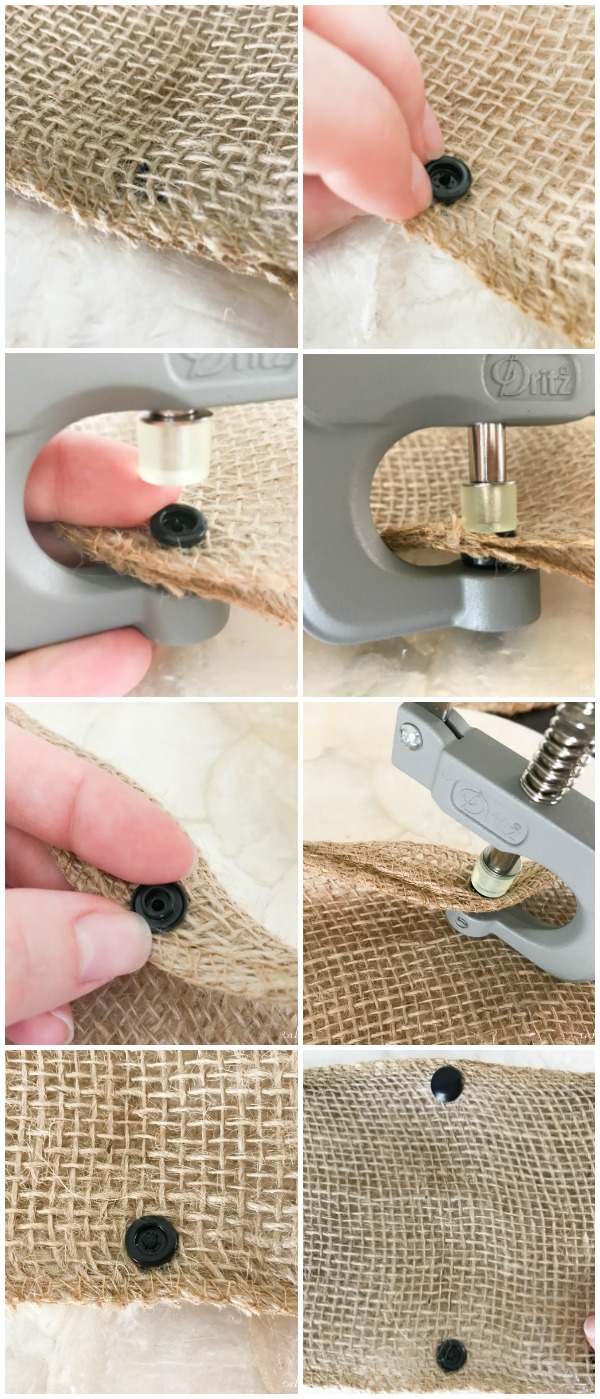
Once you have your snap placement marked and are familiar with your pliers, you’re ready to get to snapping. The steps are below but it makes more sense with the pictures and after you play with closing your ribbon to see how the snaps need to line up:
Side 1
– Place a cap underneath the ribbon, then put a female piece on top of the cap spike
– While holding these pieces together, get your pliers and sit the cap on the base of the pliers then slowly squeeze. The snap should be secured onto the ribbon and not move.
– Make sure the snap pieces and where they sit on the pliers are lined up correctly, otherwise it’ll press the snap wrong and it won’t work (ask me how I figured this out…)
Side 2
– This side will be flipped over to make the tube so place a cap on top of the ribbon this time, pointy side down, then from underneath put the male piece on the cap spike
– Use pliers and gently squeeze until secured
There are different ways you can wrap your ribbon depending on how you lay out your snaps, but the way I did mine was so they overlapped flat like this. You do want to be gentle when unsnapping so that the snap doesn’t pull through the ribbon (ask me how I know this one too…). You can sew the ends of your ribbon if you’d like but I just rolled them under once on the light so you wouldn’t be able to see the frays.

I tested my cover out on the nursery light and it looked awesome! This one was too short for my light of course but it’ll be nice to have the ability to make one the size I need next time we have a cord to cover.


I thought it would take a while to make this but once I got into a groove with the snaps it only took maybe an hour. Any easier-than-expected projects are VERY welcome right now thanks to a certain four month old. He wasn’t too intrigued by this project as this was happening during pics…also something very rare welcome right now.

I always love seeing new ways to use burlap so check out what the other girls did with their ribbon, just click each image below to head to their post!


burlap ribbon

kam snaps

snap pliers

tape measure

scissors


Reclaimed Wood-topped Desk

Coastal Nursery – The REVEAL!

DIY Changing Pad Tray

How to Make a Driftwood Mobile


Share this!
This turned out so good Em! Fits in perfectly with your decor. And love that cute little napper :)
Thanks Bre! I hope I have my napper each time I shoot a project ;)
Emily, what a gorgeous idea for a cord cover! Looks great in your son’s nursery, even if he slept right through it’s debut. (What a CUTIE!!) I hope your mom loved it for her lamp too. It looks great with your decor and you’ve made it look so simple to do. You always amaze me. I’ll miss seeing you next week at Haven.
Thank you for sharing this awesome burlap ribbon project with your readers!
Best wishes,
Carrie at Kenarry: Ideas for the Home
Thank you Carrie!! I loved the ribbon and have it slated for many more projects around here and even for gift wrapping. It’s so nice to have a big fat roll of it instead of having to get like 8 small ones at the store, that drives me crazy!
A great way to use burlap ribbon!! This is so much cuter than seeing an ugly cord. And that little cutie is so sweet!
Thank you Amanda!
This is the perfect way to hide those cords! Love it! That snap plier thing looks crazy; I didn’t know those exist. Also, I just want to snuggle that little CMan. He is the cutest!
Me neither! I was super intimidated by them and all their little parts, but it’s super simple and easy to use actually. Now I want to put snaps on everything :)
This is really neat, Em! I have never heard of that snap tool and now I want one! Love how you got CP into the project post too ;)
I hadn’t either but it’s fun to use :)
OH this is so cute and so clever! I love the idea of hiding an ugly cord with fabric. And this just fits perfectly in little C’s nursery too! <3
Thank you Erica, I feel like a lot of these may be in the future during the holidays too!
Such a great idea, Emily! And lil C is so adorable!
Thank you Kendra :)